DocumentationДокументация
Everything you need to turn alpha-masked meshes into Nanite-ready geometry — from the first click to fine-tuning every parameter.Всё, что нужно, чтобы превратить меши с альфа-маской в геометрию для Nanite — от первого клика до тонкой настройки каждого параметра.
Overview
Ready For Nanite is a Blender add-on that turns meshes with alpha-channel cutouts into geometry suitable for Nanite in Unreal Engine 5.
If you have a bush, a tree, grass, cloth or a grate made as planes with a texture and an alpha mask, the add-on builds real geometry from it: it traces the outlines of the opaque areas, cuts out the holes and transfers UVs, normals and vertex colors. The result can be imported into UE5 and used with Nanite right away.
The triangle count goes up, and for Nanite that is the right trade. Nanite streams and culls geometry in small clusters and picks detail per pixel, so its cost follows screen resolution rather than mesh size. What actually slows Nanite down is the alpha mask: masked materials are evaluated during rasterization and stack overdraw in dense foliage. Opaque triangles put your foliage on the path Nanite was built for, faster to render and with real silhouettes in shadows and at distance.
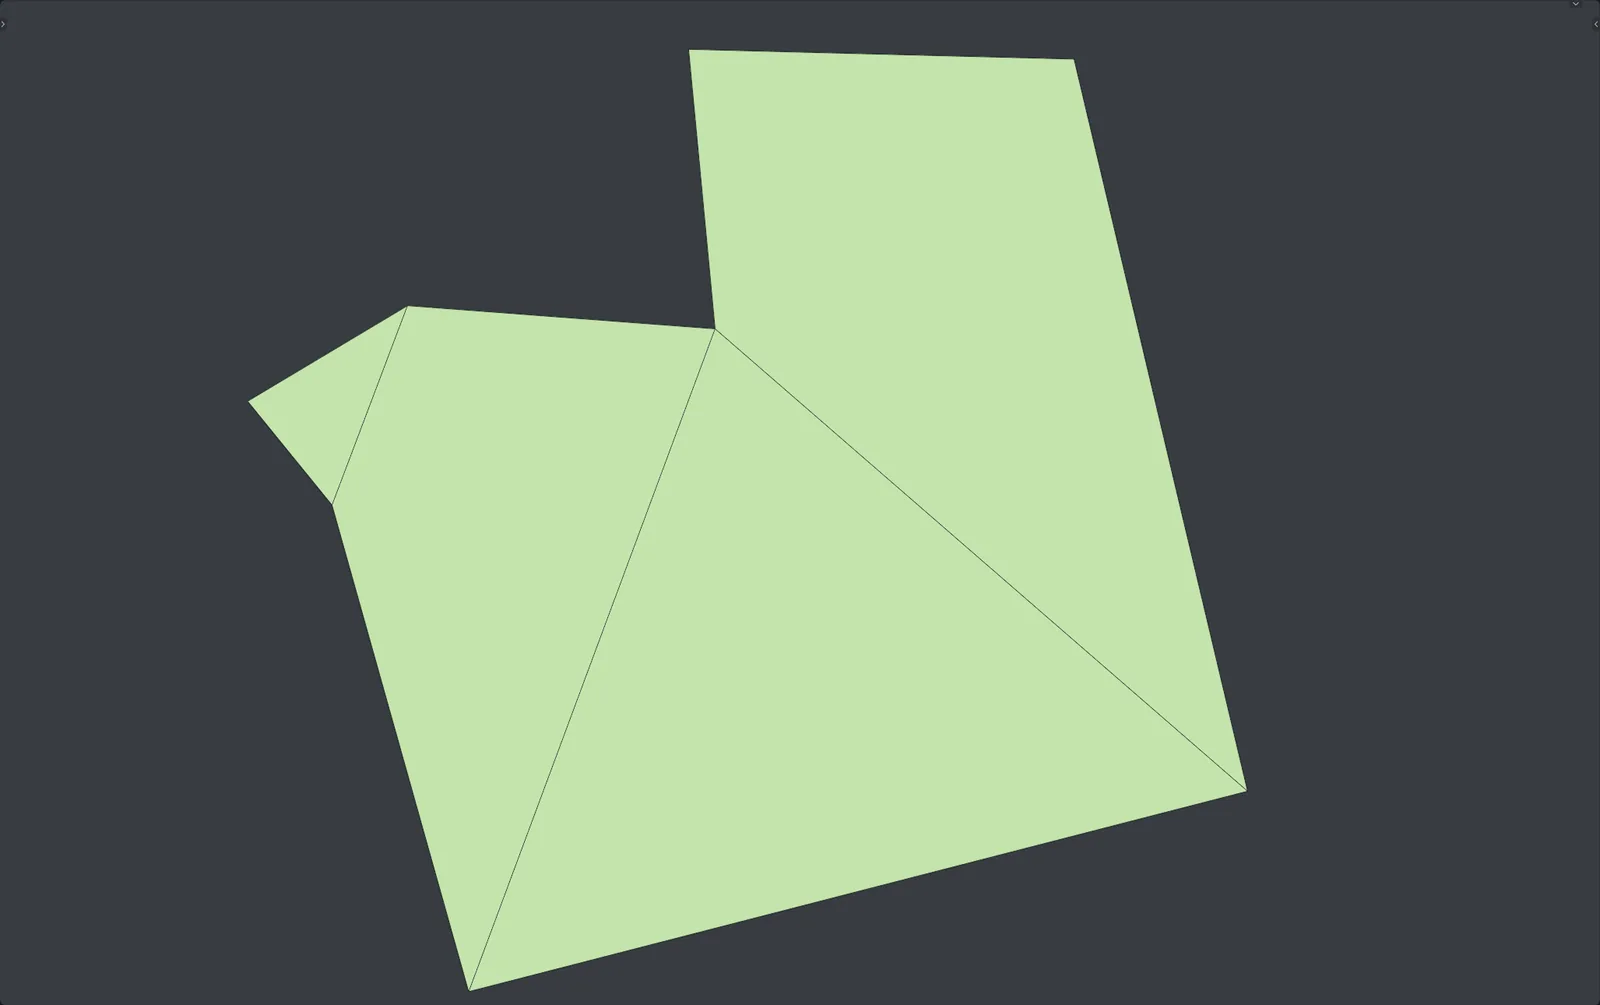
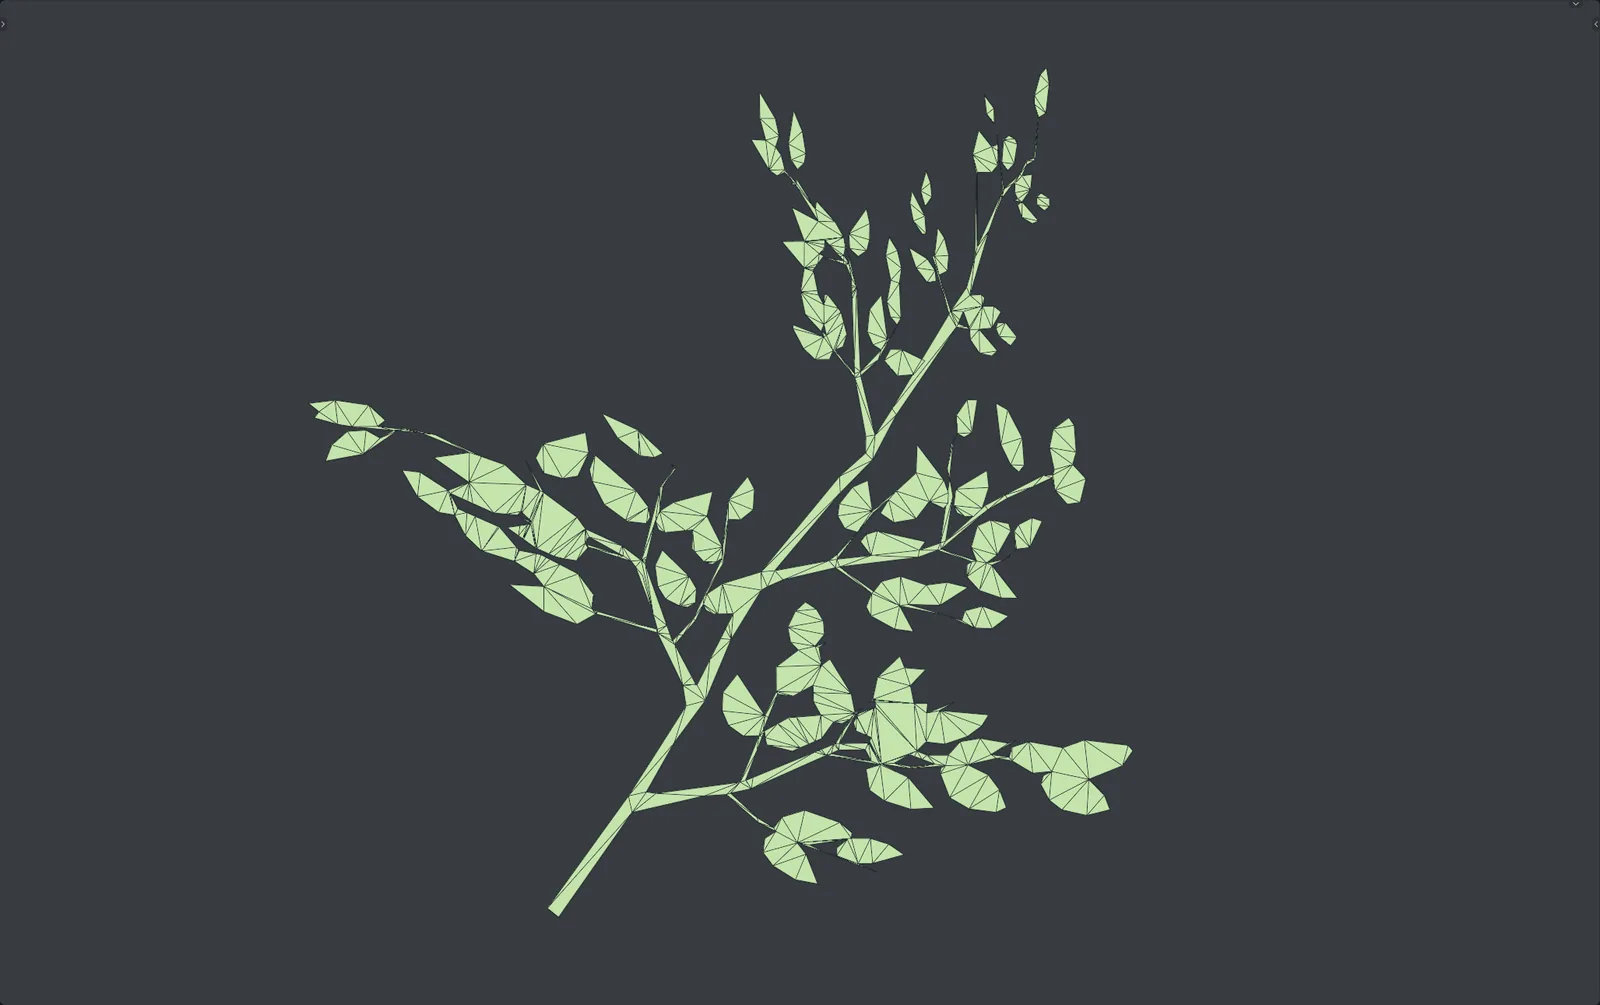
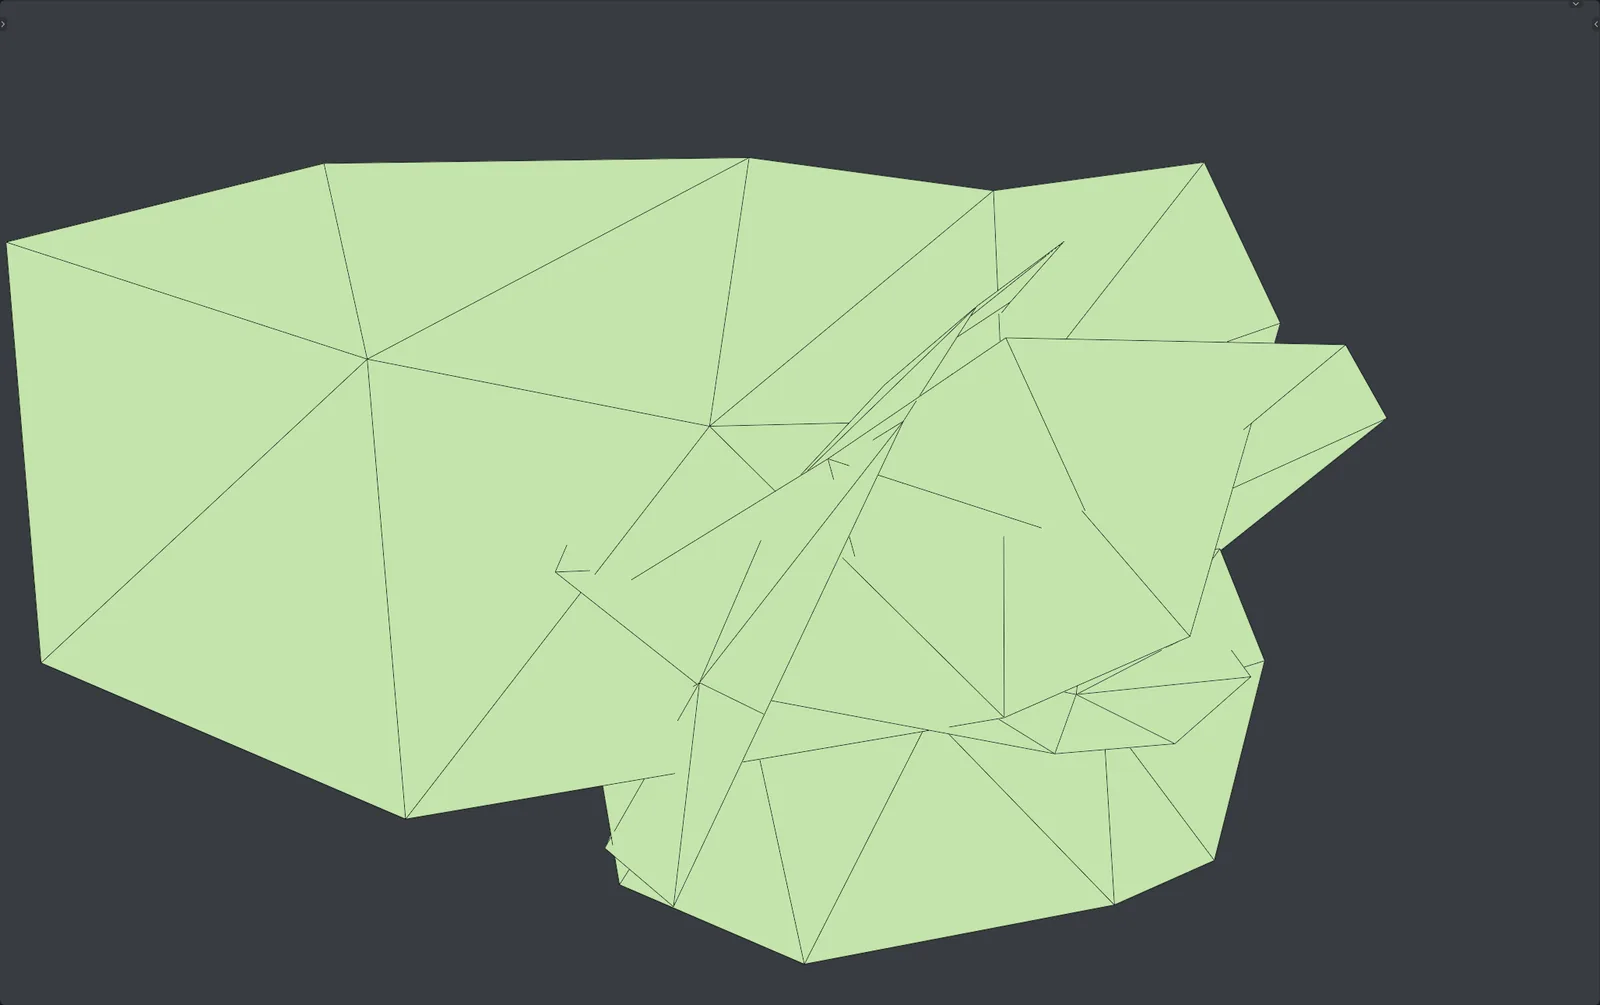
Left: the source card (4 polygons). Right: the result (812 triangles), every leaf is geometry.
Обзор
Ready For Nanite — аддон для Blender, который превращает меши с вырезами по альфа-каналу в геометрию, подходящую для Nanite в Unreal Engine 5.
Если у вас есть куст, дерево, трава, ткань или решётка, сделанные плоскостями с текстурой и альфа-маской, аддон построит из этого настоящую геометрию: обведёт контуры непрозрачных областей, вырежет дырки и перенесёт UV, нормали и цвета вершин. Результат можно сразу импортировать в UE5 и включить на нём Nanite.
Треугольников становится больше, и для Nanite это правильный обмен. Nanite подгружает и отсекает геометрию маленькими кластерами и выбирает детализацию по пикселям, поэтому его цена зависит от разрешения экрана, а не от размера меша. По-настоящему Nanite тормозит альфа-маска: masked-материалы вычисляются прямо при растеризации и копят перерисовку в плотной листве. Непрозрачные треугольники переводят листву на путь, для которого Nanite и создан, — быстрее в рендере и с настоящим силуэтом в тенях и на расстоянии.
Слева — исходная карточка (4 полигона). Справа — результат (812 треугольников), каждый лист — геометрия.
Installation
Requirements
- Blender 4.5 or newer. Tested on 4.5 and 5.2 LTS.
- A mesh with a UV map and a node-based material whose alpha comes from an Image Texture (see Material setup).
- Enough RAM for big jobs: a 1.6M-triangle result is a few hundred MB in Blender.
Install
- Buy the add-on on Gumroad or Blendkit and download the
.zip. Do not unpack it. - In Blender open Edit › Preferences › Get Extensions (or Add-ons).
- Open the ⌄ menu in the top-right corner and choose Install from Disk…, then pick the downloaded file. You can also simply drag the
.zipinto the Blender window. - Make sure Ready For Nanite is enabled in the add-on list.
- In the 3D Viewport press N to open the sidebar and select the Ready For Nanite tab.
Updating
Install the new version over the old one the same way and restart Blender. Settings are stored in the scene (.blend file) and are kept.
Установка
Требования
- Blender 4.5 или новее. Проверено на 4.5 и 5.2 LTS.
- Меш с UV-развёрткой и нодовым материалом, у которого альфа идёт из Image Texture (см. Настройка материала).
- Достаточно памяти для больших задач: результат на 1,6 млн треугольников занимает в Blender несколько сотен МБ.
Установка
- Купите аддон на Gumroad или Blendkit и скачайте
.zip. Распаковывать не нужно. - В Blender откройте Edit › Preferences › Get Extensions (или Add-ons).
- Откройте меню ⌄ в правом верхнем углу, выберите Install from Disk… и укажите скачанный файл. Можно просто перетащить
.zipв окно Blender. - Убедитесь, что Ready For Nanite включён в списке аддонов.
- Во вьюпорте нажмите N, чтобы открыть боковую панель, и выберите вкладку Ready For Nanite.
Обновление
Установите новую версию поверх старой тем же способом и перезапустите Blender. Настройки хранятся в сцене (файле .blend) и сохраняются.
Material setup
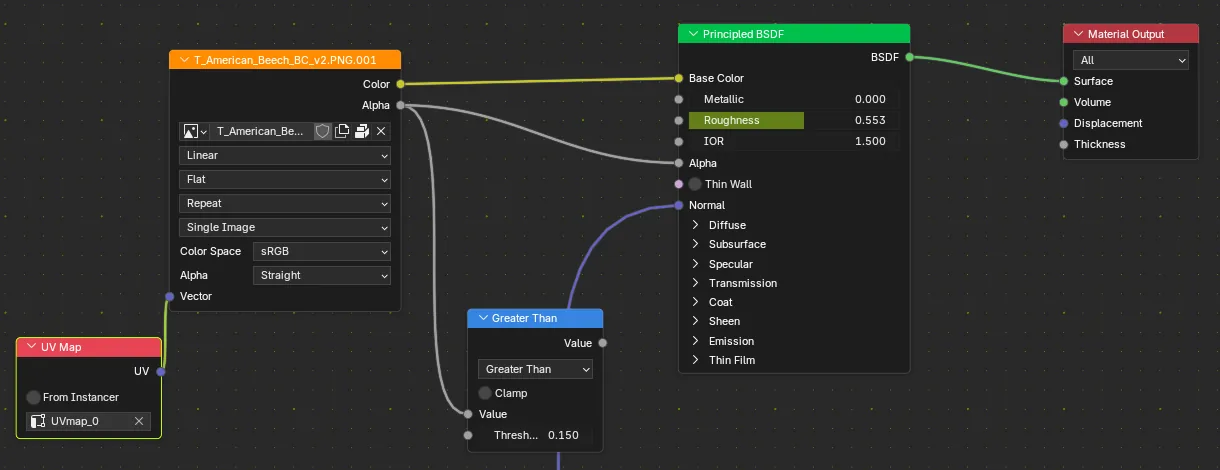
The add-on looks for the mask in the material's Principled BSDF node. Only direct connections are followed — the add-on does not evaluate Math, Mix, ColorRamp or other nodes placed in between.
Supported connections
| Connection | Channel used as mask | Typical use |
|---|---|---|
Image Texture Alpha → BSDF Alpha | Alpha channel | PNG/TGA with transparency (recommended) |
Image Texture Color → BSDF Alpha | Brightness (luminance) of RGB | Separate black-and-white opacity map |
Image Texture → Separate Color (or Separate RGB) → Red/Green/Blue → BSDF Alpha | The selected R, G or B channel | Channel-packed masks (e.g. opacity in the blue channel of an ORM texture) |
Nothing on Alpha, Image Texture on Base Color | Brightness of the base color | Fallback only — see the warning below |
If Alpha is not linked, the add-on falls back to the brightness of the Base Color texture. For ordinary diffuse textures that is rarely a correct mask (dark leaves may be treated as holes). Connect the mask explicitly.
With the mask wired into Alpha, Material Preview shows exactly what the add-on will see, so you can spot problems in the texture before processing. Set the material's Blend Mode/Render Method so that transparency is visible in the viewport.
Each material is handled separately. Material slots without an alpha texture (bark, trunk, stones…) are passed through unchanged and joined back into the result.
Настройка материала
Аддон ищет маску в ноде Principled BSDF материала. Учитываются только прямые подключения — Math, Mix, ColorRamp и другие ноды между текстурой и BSDF не вычисляются.
Поддерживаемые подключения
| Подключение | Что используется как маска | Когда применять |
|---|---|---|
Image Texture Alpha → BSDF Alpha | Альфа-канал | PNG/TGA с прозрачностью (рекомендуется) |
Image Texture Color → BSDF Alpha | Яркость (luminance) RGB | Отдельная чёрно-белая карта прозрачности |
Image Texture → Separate Color (или Separate RGB) → Red/Green/Blue → BSDF Alpha | Выбранный канал R, G или B | Упакованные маски (например, прозрачность в синем канале ORM-текстуры) |
На Alpha ничего, Image Texture на Base Color | Яркость базового цвета | Только запасной вариант — см. предупреждение |
Если Alpha не подключён, аддон берёт яркость текстуры Base Color. Для обычной диффузной текстуры это почти никогда не корректная маска (тёмные листья могут стать дырками). Подключайте маску явно.
Когда маска подключена к Alpha, Material Preview показывает ровно то, что увидит аддон, и ошибки текстуры видны ещё до обработки. Настройте Blend Mode / Render Method материала так, чтобы прозрачность была видна во вьюпорте.
Каждый материал обрабатывается отдельно. Слоты материалов без альфа-текстуры (кора, ствол, камни…) проходят без изменений и присоединяются к результату.
Quick start
- Set up the materials as described in Material setup.
- Select one or more mesh objects.
- Open the Ready For Nanite tab in the sidebar (N).
- Leave the parameters at their defaults, or press Reset to Defaults.
- For a big object press Estimate Processing to see how long the full run will take.
- Press Quick Test: only one instance of each unique part is processed into
<name>_nanite_test. Inspect it in wireframe and Material Preview. - Not happy? Delete the test object, adjust the settings (contours too rough → lower Simplify Tolerance; wrong holes → Contour Classification Threshold) and test again.
- When it looks right, press Process Selected. The result appears as
<name>_nanitenext to the source.

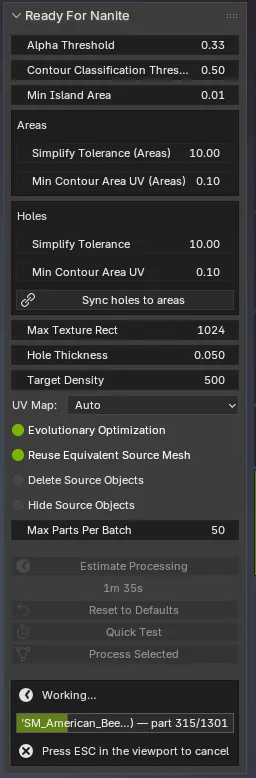
The panel at rest and during processing (progress bar, Esc to cancel).
Быстрый старт
- Настройте материалы, как описано в разделе Настройка материала.
- Выделите один или несколько меш-объектов.
- Откройте вкладку Ready For Nanite в боковой панели (N).
- Оставьте параметры по умолчанию или нажмите Reset to Defaults.
- Для крупного объекта нажмите Estimate Processing — увидите, сколько займёт полный прогон.
- Нажмите Quick Test: обрабатывается только один экземпляр каждой уникальной части, результат —
<имя>_nanite_test. Проверьте его в Wireframe и Material Preview. - Не нравится? Удалите тестовый объект, поправьте настройки (грубые контуры → уменьшите Simplify Tolerance; неправильные дырки → Contour Classification Threshold) и повторите тест.
- Когда всё устраивает — нажмите Process Selected. Результат появится рядом с исходником как
<имя>_nanite.
Панель в покое и во время обработки (прогресс-бар, Esc — отмена).
How it works
What happens when you press Process Selected:
- Split by materials. Each selected object is split into one part per material, because each material has its own alpha texture. Parts without an alpha texture are kept as-is.
- Split into loose parts. Inside each material part, disconnected pieces are detected. A bush of ten separate leaf cards is ten pieces; each is processed independently, one at a time, to keep memory low.
- Densify. A temporary copy of the piece is subdivided up to Target Density so that UV → 3D projection and UV transfer are accurate.
- Read the alpha. Only the texture rectangle covered by the piece's UVs is read (and downsampled if larger than Max Texture Rect).
- Trace contours. Marching squares finds closed outlines where alpha crosses Alpha Threshold.
- Classify. Each contour is sampled: mostly opaque inside → body, mostly transparent → hole.
- Simplify & filter. Douglas–Peucker removes redundant points; tiny contours are dropped. Bodies and holes have separate settings.
- Project to 3D. Every contour point is located on the dense mesh in UV space and its 3D position is interpolated barycentrically.
- Fill. Body contours are filled with triangles. Hole contours become a separate flat mesh.
- Cut holes. The hole mesh gets thickness (Hole Thickness) and is subtracted with an exact Boolean DIFFERENCE.
- Transfer. UVs are copied from the dense copy; custom normals and color attributes are taken from the original piece (sharp edges are preserved). Tiny 3D islands are removed (Min Island Area).
- Merge. All processed pieces plus the passthrough parts are joined into
<name>_nanite. Pieces that failed go to the<name>_brokencollection.
With caching enabled, steps 3–10 are skipped for pieces that are identical to one already processed — see Caching.
Как это работает
Что происходит после нажатия Process Selected:
- Разделение по материалам. Каждый объект делится на части по материалам — у каждого материала своя альфа-текстура. Части без альфа-текстуры остаются как есть.
- Разделение на куски. Внутри каждой части находятся несвязанные куски. Куст из десяти отдельных карточек — это десять кусков; каждый обрабатывается отдельно и по одному, чтобы экономить память.
- Уплотнение. Временная копия куска подразделяется до Target Density, чтобы проекция UV → 3D и перенос UV были точными.
- Чтение альфы. Читается только прямоугольник текстуры, покрытый UV куска (и уменьшается, если он больше Max Texture Rect).
- Поиск контуров. Marching squares находит замкнутые контуры там, где альфа пересекает Alpha Threshold.
- Классификация. Внутри каждого контура берутся пробы: в основном непрозрачно → тело, в основном прозрачно → дырка.
- Упрощение и фильтрация. Алгоритм Дугласа–Пекера убирает лишние точки; крошечные контуры отбрасываются. У тел и дырок — отдельные настройки.
- Перенос в 3D. Каждая точка контура находится на плотном меше в UV-пространстве, а её 3D-позиция интерполируется барицентрически.
- Заливка. Контуры тел заливаются треугольниками. Контуры дырок становятся отдельным плоским мешем.
- Вырезание дырок. Меш дырок получает толщину (Hole Thickness) и вычитается точной булевой операцией DIFFERENCE.
- Перенос данных. UV копируются с плотной копии; кастомные нормали и цветовые атрибуты — с исходного куска (жёсткие рёбра сохраняются). Мелкие 3D-островки удаляются (Min Island Area).
- Сборка. Все обработанные куски и части без альфы объединяются в
<имя>_nanite. Куски с ошибками попадают в коллекцию<имя>_broken.
Со включённым кэшированием шаги 3–10 пропускаются для кусков, идентичных уже обработанным, — см. Кэширование.
Parameters: overview & defaults
Simplify Tolerance, Min Contour Area UV and Min Island Area are tiny numbers internally, so the panel shows them multiplied by 10,000. A displayed 0.5 means 0.00005 in UV space. Just think of them as relative "more / less" sliders.
| Parameter | Default | Units | Page |
|---|---|---|---|
| Alpha Threshold | 0.15 | alpha 0–1 | Alpha & contours |
| Contour Classification Threshold | 0.50 | fraction 0–1 | Alpha & contours |
| Min Island Area | 0.1 | scene units² ×10⁴ | Density & quality |
| Simplify Tolerance (Areas) | 0.5 | UV ×10⁴ | Areas |
| Min Contour Area UV (Areas) | 0.1 | UV² ×10⁴ | Areas |
| Simplify Tolerance (Holes) | 0.1 | UV ×10⁴ | Holes |
| Min Contour Area UV (Holes) | 0.1 | UV² ×10⁴ | Holes |
| Max Texture Rect | 1024 | pixels (power of two) | Texture |
| Hole Thickness | 0.01 | scene units | Holes |
| Target Density | 500 | triangles / unit² | Density & quality |
| UV Map | Auto | — | UV Map |
| Evolutionary Optimization | On | — | Caching |
| Reuse Equivalent Source Mesh | On | — | Caching |
| Delete / Hide Source Objects | Off | — | Source objects |
| Max Parts Per Batch | 50 | parts | Batching |
| Instance Tolerance | 0.5 % | % of part size | Nanite Assemblies |
Hover over any field in Blender to see its tooltip with the same information.
Параметры: обзор и значения по умолчанию
Simplify Tolerance, Min Contour Area UV и Min Island Area внутри — очень маленькие числа, поэтому панель показывает их умноженными на 10 000. Показанное 0.5 означает 0.00005 в UV. Воспринимайте их как относительные ползунки «больше / меньше».
| Параметр | По умолчанию | Единицы | Раздел |
|---|---|---|---|
| Alpha Threshold | 0.15 | альфа 0–1 | Альфа и контуры |
| Contour Classification Threshold | 0.50 | доля 0–1 | Альфа и контуры |
| Min Island Area | 0.1 | ед. сцены² ×10⁴ | Плотность и качество |
| Simplify Tolerance (Areas) | 0.5 | UV ×10⁴ | Области |
| Min Contour Area UV (Areas) | 0.1 | UV² ×10⁴ | Области |
| Simplify Tolerance (Holes) | 0.1 | UV ×10⁴ | Дырки |
| Min Contour Area UV (Holes) | 0.1 | UV² ×10⁴ | Дырки |
| Max Texture Rect | 1024 | пиксели (степень двойки) | Текстура |
| Hole Thickness | 0.01 | ед. сцены | Дырки |
| Target Density | 500 | треугольников / ед.² | Плотность и качество |
| UV Map | Auto | — | UV Map |
| Evolutionary Optimization | Вкл. | — | Кэширование |
| Reuse Equivalent Source Mesh | Вкл. | — | Кэширование |
| Delete / Hide Source Objects | Выкл. | — | Исходные объекты |
| Max Parts Per Batch | 50 | куски | Батчинг |
| Instance Tolerance | 0.5 % | % от размера куска | Nanite Assemblies |
Наведите курсор на любое поле в Blender — во всплывающей подсказке та же информация.
Alpha & contours
Two parameters that define where the texture has "body" and where it has a "hole".
Alpha Threshold
What it does. Every pixel with alpha ≥ threshold is opaque (body), below — transparent. It is used both for tracing contours and for classifying them, so it affects everything.
- Low (0.05) — captures almost-transparent fringes; contours get slightly wider. Good for soft edges, but noise may turn into geometry and processing gets slower.
- High (0.33) — keeps only dense opaque areas; contours get slightly narrower. 0.33 matches the default opacity mask clip value of Masked materials in Unreal Engine. May close narrow gaps and eat thin twigs.
How to tune. Start at 0.15. Garbage along leaf edges → raise to 0.25–0.33. Thin twigs or grass blades disappear → lower to 0.05–0.1. To match what you see in Unreal, use the same value as your material's opacity mask clip.
Contour Classification Threshold
What it does. For each closed contour the add-on samples the fraction of opaque pixels inside it. Fraction ≥ threshold → body (kept); below → hole (cut out).
- 0.5 — body if more than half of the inside is opaque. Works in most cases.
- Lower (0.3) — use when a detail lies inside a hole (a flower inside a gap between leaves) and disappears at 0.5.
- Higher (0.7) — use when thin semi-transparent bridges wrongly become body.
Альфа и контуры
Два параметра, которые определяют, где у текстуры «тело», а где «дырка».
Alpha Threshold
Что делает. Пиксель с альфой ≥ порога считается непрозрачным (тело), ниже — прозрачным. Порог используется и при поиске контуров, и при их классификации, поэтому влияет на всё сразу.
- Низкий (0.05) — захватывает почти прозрачную кайму, контур чуть шире. Полезно для мягких краёв, но шум может стать геометрией, а обработка — дольше.
- Высокий (0.33) — берёт только плотные непрозрачные области, контур чуть уже. 0.33 соответствует стандартному Opacity Mask Clip Value у Masked-материалов в Unreal Engine. Может «съесть» узкие просветы и тонкие веточки.
Как подбирать. Начните с 0.15. Мусор по краям листьев → поднимите до 0.25–0.33. Пропадают тонкие веточки или травинки → опустите до 0.05–0.1. Чтобы результат совпадал с тем, что видно в Unreal, используйте то же значение, что и Opacity Mask Clip в материале.
Contour Classification Threshold
Что делает. Для каждого замкнутого контура считается доля непрозрачных пикселей внутри. Доля ≥ порога → тело (остаётся); меньше → дырка (вырезается).
- 0.5 — тело, если больше половины внутри непрозрачно. Работает в большинстве случаев.
- Ниже (0.3) — если деталь лежит внутри дырки (цветок в просвете между листьями) и пропадает при 0.5.
- Выше (0.7) — если тонкие полупрозрачные перемычки ошибочно становятся телом.
Areas
Quality of the body (opaque) contours.
Simplify Tolerance (Areas)
What it does. A traced contour has a point on every pixel step. Douglas–Peucker removes points that deviate from a straight line by less than this tolerance.
- Higher — fewer points and triangles, faster; curves become angular. Large values (5–10) simplify better than a Decimate afterwards — in a dense crown, per-leaf precision is invisible and Nanite still benefits from leaner meshes.
- Lower — every bend is kept, more triangles, slower. 0 disables simplification (usually overkill).
Note. It is measured in UV space, so the same value means more pixels on a small texture and fewer on a large one.
Min Contour Area UV (Areas)
What it does. Body contours with a UV area below this value are discarded before any geometry is built. It cleans up alpha noise: stray pixels and specks that would otherwise each become tiny triangles.
How to tune. Lots of small parasitic triangles → increase. Needed small details vanish → decrease. 0 disables filtering.
Области (Areas)
Качество контуров тела (непрозрачных областей).
Simplify Tolerance (Areas)
Что делает. У найденного контура есть точка на каждом шаге пикселя. Алгоритм Дугласа–Пекера убирает точки, отклоняющиеся от прямой меньше чем на этот допуск.
- Больше — меньше точек и треугольников, быстрее; изгибы становятся угловатыми. Большие значения (5–10) упрощают лучше, чем Decimate потом: в плотной кроне точность каждого листа не видна, а Nanite тоже выигрывает от более лёгких мешей.
- Меньше — сохраняются все изгибы, больше треугольников, медленнее. 0 отключает упрощение (обычно избыточно).
Важно. Значение задаётся в UV-пространстве, поэтому на маленькой текстуре оно покрывает больше пикселей, а на большой — меньше.
Min Contour Area UV (Areas)
Что делает. Контуры тела с площадью в UV меньше этого значения отбрасываются ещё до построения геометрии. Убирает шум альфы: случайные пиксели и крапинки, которые иначе стали бы крошечными треугольниками.
Как подбирать. Много мелких паразитных треугольников → увеличьте. Пропадают нужные мелкие детали → уменьшите. 0 — без фильтрации.
Holes
Holes are transparent areas inside the opaque body: gaps between leaves, openings in cloth, cells of a grate. Their settings are separate from Areas on purpose — often you want a coarse body but precise holes, or the other way around.
Simplify Tolerance (Holes)
Same as for Areas, but for hole contours. Large values may skip small openings entirely; small values add vertices but keep the holes neat.
Min Contour Area UV (Holes)
Discards holes that are too small. Every hole goes through the Boolean, and many tiny holes make it slower and less stable. If the Boolean hangs or produces artifacts — increase it.
Hole Thickness
What it does. Flat hole shapes are given volume (half forward, half backward) with a Solidify modifier so that the Boolean can subtract them.
- Too small — the Boolean may fail and leave artifacts. 0 — holes are not cut at all.
- Too large — on curved or thin surfaces the cutter reaches neighbouring geometry and holes get bigger than they should.
How to tune. 0.01 suits objects of 1–3 m. For a 20 cm twig try 0.001; for a 10–20 m tree, 0.05. It depends on object scale, so apply scale (Ctrl+A › Scale) before processing.
Sync holes to areas
Button that copies Simplify Tolerance and Min Contour Area UV from Areas into Holes — use it when you want holes processed exactly like the body.
Дырки (Holes)
Дырки — прозрачные области внутри непрозрачного тела: просветы между листьями, отверстия в ткани, ячейки решётки. Их настройки специально отделены от Areas — часто нужно грубое тело, но точные дырки, или наоборот.
Simplify Tolerance (Holes)
То же, что для Areas, но для контуров дырок. Большие значения могут вовсе пропустить мелкие отверстия; маленькие добавляют вершин, но дырки получаются аккуратнее.
Min Contour Area UV (Holes)
Отбрасывает слишком маленькие дырки. Каждая дырка проходит через Boolean, и множество крошечных дырок замедляет его и делает нестабильным. Если Boolean зависает или даёт артефакты — увеличьте.
Hole Thickness
Что делает. Плоским фигурам дырок придаётся объём (половина вперёд, половина назад) модификатором Solidify, чтобы Boolean мог их вычесть.
- Слишком мало — Boolean может не сработать и оставить артефакты. 0 — дырки не вырезаются вовсе.
- Слишком много — на изогнутых или тонких поверхностях резак задевает соседнюю геометрию, дырки становятся больше нужного.
Как подбирать. 0.01 подходит для объектов 1–3 м. Для веточки 20 см попробуйте 0.001, для дерева 10–20 м — 0.05. Значение зависит от масштаба объекта, поэтому примените масштаб (Ctrl+A › Scale) перед обработкой.
Sync holes to areas
Кнопка копирует Simplify Tolerance и Min Contour Area UV из Areas в Holes — когда дырки нужно обрабатывать так же, как тело.
Texture
Max Texture Rect
What it does. Limits the size (longest side, in pixels) of the texture region that gets traced. If the UVs of a piece cover a larger region, it is downsampled to fit. The value snaps to powers of two.
Why. Marching squares walks pixel by pixel. A 4096² region is 16 million pixels; for a small bush 1024 gives nearly the same result in a fraction of the time.
How to tune. Increase to 2048–4096 if thin grass blades or leaf serrations lose their shape. Decrease to 512 if processing is slow and detail is not critical.
Only the area under the piece's UVs is read. A leaf that uses 1/8 of a 4K atlas is a ~512 px region, so a 1024 limit never kicks in.
Текстура
Max Texture Rect
Что делает. Ограничивает размер (по длинной стороне, в пикселях) области текстуры, которая трассируется. Если UV куска покрывают область больше — она уменьшается. Значение округляется до степени двойки.
Зачем. Marching squares идёт попиксельно. Область 4096² — это 16 млн пикселей; для небольшого куста 1024 даёт почти тот же результат за долю времени.
Как подбирать. Увеличьте до 2048–4096, если тонкие травинки или зубчики листьев теряют форму. Уменьшите до 512, если обработка долгая, а детализация не критична.
Читается только область под UV куска. Лист, занимающий 1/8 атласа 4K, — это область около 512 px, поэтому лимит 1024 не срабатывает.
Density & quality
Target Density
What it does. Before projection, a temporary copy of each piece is subdivided until it reaches this density. Each level multiplies the triangle count by ~4; at most 6 levels are applied.
Why. A leaf card is often a single quad. Contour points are placed on it via UV, and UVs are transferred from it — a coarse source gives drifting UVs on curved cards. The dense copy is temporary and does not end up in the result.
How to tune. 500 suits most assets. Raise to 2000–5000 if you see UV "stair steps" on curved surfaces. Lower if processing is slow and the cards are flat.
Min Island Area
What it does. After building, connected pieces of the result are measured in 3D; those smaller than this value are deleted (leftovers from simplification and Boolean, stray specks).
Tip. It is also a cheap way to slim a model: removing a few of the tiniest leaves is invisible in a dense bush but saves triangles. 0 deletes nothing.
Difference from Min Contour Area UV: that one filters contours in UV before building; this one filters finished 3D pieces after. Both are useful.
Плотность и качество
Target Density
Что делает. Перед проекцией временная копия каждого куска подразделяется до этой плотности. Каждый уровень увеличивает число треугольников примерно в 4 раза; максимум — 6 уровней.
Зачем. Карточка листа часто — один квад. Точки контура ставятся на неё через UV, и UV переносятся с неё же — на грубом исходнике UV «плывут» на изогнутых карточках. Плотная копия временная и в результат не попадает.
Как подбирать. 500 хватает для большинства ассетов. Поднимите до 2000–5000, если на изогнутых поверхностях видны «ступеньки» UV. Уменьшите, если обработка долгая, а карточки плоские.
Min Island Area
Что делает. После построения связные куски результата измеряются в 3D; те, что меньше этого значения, удаляются (остатки упрощения и Boolean, случайные крапинки).
Совет. Это ещё и дешёвый способ облегчить модель: удаление нескольких самых мелких листьев в плотном кусте незаметно, а треугольников становится меньше. 0 — ничего не удаляется.
Отличие от Min Contour Area UV: тот фильтрует контуры в UV до построения, а этот — готовые 3D-куски после. Полезны оба.
UV Map
Selects which UV layer is used to read the texture.
- Auto — uses the first UV layer. The chosen name is remembered and reused for all parts and objects in the batch, so split pieces keep referring to the same layer.
- A specific name — pick it when the object has several UV layers and the textured one is not first (e.g. a lightmap UV is first).
Objects without any UV layer, or with zero UV area, cannot be processed and go to the _broken collection.
UV Map
Выбирает, по какой UV-развёртке читать текстуру.
- Auto — берётся первая UV-развёртка. Её имя запоминается и используется для всех кусков и объектов в пакете, чтобы разделённые части ссылались на тот же слой.
- Конкретное имя — если у объекта несколько развёрток и текстурная не первая (например, первой идёт развёртка лайтмапы).
Объекты без UV или с нулевой площадью UV обработать нельзя — они попадут в коллекцию _broken.
Caching
Most foliage reuses the same cards hundreds of times. The caches find repeated pieces and reuse what was already computed instead of going through the whole pipeline again. They also guarantee that identical pieces come out identical, without artifacts in some of them. This is what took a complex tree from two hours to four minutes.
Both options are on by default and work within one run across all selected objects — processing a batch of similar models together is faster than one by one.
Evolutionary Optimization
Caches the UV contour result of a piece, keyed by its UV identity. When another piece has exactly the same UV layout, tracing, classification and simplification are skipped; only the projection onto the new 3D shape is done.
Reuse Equivalent Source Mesh
A deeper level (shown only when Evolutionary Optimization is on). If a piece has identical topology and UVs, the entire finished Nanite mesh is reused and fitted onto the new piece: every result vertex is mapped by its UV coordinate onto the new surface. Subsequent duplicates are processed almost instantly.
If every object is unique, the caches never hit and only cost a little time and memory. If pieces share UVs but differ in topology or shape, keep Evolutionary Optimization and turn off Reuse Equivalent Source Mesh.
The cache lives only for one run. After the run (or after restarting Blender) it is empty, and the first piece of each kind is processed in full again.
Кэширование
Большая часть листвы использует одни и те же карточки сотни раз. Кэши находят повторяющиеся куски и переиспользуют уже посчитанное вместо прохода всего пайплайна заново. Они же гарантируют, что одинаковые куски получатся одинаковыми, без артефактов в части из них. Именно это сократило обработку сложного дерева с двух часов до четырёх минут.
Обе опции включены по умолчанию и работают в пределах одного запуска для всех выделенных объектов — пакет похожих моделей вместе обрабатывается быстрее, чем по одной.
Evolutionary Optimization
Кэширует результат контуров в UV куска; ключ — идентичность UV. Если у другого куска точно такая же развёртка, трассировка, классификация и упрощение пропускаются; выполняется только проекция на новую 3D-форму.
Reuse Equivalent Source Mesh
Более глубокий уровень (виден, только когда включён Evolutionary Optimization). Если у куска идентичны топология и UV, переиспользуется весь готовый Nanite-меш и подгоняется под новый кусок: каждая вершина результата переносится по своей UV-координате на новую поверхность. Последующие дубликаты обрабатываются почти мгновенно.
Если все объекты уникальны, кэш не срабатывает и лишь немного тратит время и память. Если UV у кусков совпадают, а топология или форма — нет, оставьте Evolutionary Optimization и выключите Reuse Equivalent Source Mesh.
Кэш живёт только в пределах одного запуска. После него (или после перезапуска Blender) он пуст, и первый кусок каждого вида снова обрабатывается полностью.
Source objects
What happens to the originals after a successful run. By default they stay untouched and the result <name>_nanite is placed next to them (at the same location).
- Delete Source Objects — removes the originals. Use only when you are sure; you can still Ctrl+Z in the same session.
- Hide Source Objects — hides the originals but keeps them, so you can compare or redo with other settings.
If both are enabled, deletion wins.
Исходные объекты
Что происходит с оригиналами после успешной обработки. По умолчанию они не трогаются, а результат <имя>_nanite появляется рядом (в том же месте).
- Delete Source Objects — удаляет оригиналы. Включайте, только если уверены; в той же сессии можно сделать Ctrl+Z.
- Hide Source Objects — скрывает оригиналы, но сохраняет их, чтобы сравнить или переделать с другими настройками.
Если включены обе опции, приоритет у удаления.
Batching
Max Parts Per Batch
Parts are always built and processed one at a time, so only one source piece is in memory at once — this is what keeps Blender stable on meshes with thousands of loose parts. This value only sets how often a checkpoint runs: every N parts the finished pieces are merged into an intermediate block and the scene is refreshed.
Leave it at 50. Lower values add a little overhead; very high values make each merge heavier. Set 0 to disable checkpoints.
Батчинг
Max Parts Per Batch
Куски всегда строятся и обрабатываются по одному, поэтому в памяти одновременно только один исходный кусок — благодаря этому Blender стабилен на мешах с тысячами отдельных частей. Этот параметр задаёт лишь частоту контрольных точек: каждые N кусков готовые части объединяются в промежуточный блок, а сцена обновляется.
Оставьте 50. Меньшие значения добавляют немного накладных расходов; очень большие делают каждое объединение тяжелее. 0 — отключить контрольные точки.
Progress & cancel
Estimate, Quick Test and Process Selected run as background jobs: Blender's window stays responsive and the panel shows a progress bar with the current step (for example part 315/1301). While a job runs, the buttons are disabled.
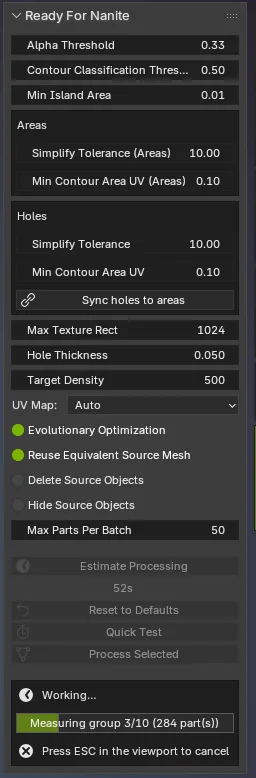
- Press Esc with the mouse over the 3D Viewport to cancel. Everything created during the run is removed and object visibility is restored — the scene returns to its previous state.
- To speed things up, other objects are temporarily hidden during processing and shown again at the end.
- When called from a Python script (without a window), the operators run synchronously, without a progress bar.
Прогресс и отмена
Estimate, Quick Test и Process Selected работают как фоновые задачи: окно Blender остаётся отзывчивым, а на панели виден прогресс-бар с текущим шагом (например, part 315/1301). Пока задача идёт, кнопки неактивны.
- Нажмите Esc, наведя мышь на 3D-вьюпорт, чтобы отменить. Всё созданное за время запуска удаляется, видимость объектов восстанавливается — сцена возвращается в прежнее состояние.
- Для ускорения остальные объекты на время обработки скрываются и снова показываются в конце.
- При вызове из Python-скрипта (без окна) операторы выполняются синхронно, без прогресс-бара.
Export to Unreal Engine
- Select the
_naniteobject. Make sure the transform is applied (Ctrl+A › All Transforms) if you need a clean pivot. - File › Export › FBX: enable Selected Objects, Smoothing: Face, keep Apply Transform as your project requires. The result already contains custom normals, so do not recompute them in Unreal.
- In Unreal, import the FBX and enable Build Nanite (or enable Nanite Support in the Static Mesh editor afterwards). Set Normal Import Method to Import Normals.
- Switch the leaf material from Masked to Opaque — the cutout is now real geometry, so the opacity mask is no longer needed. Keep Two Sided if the foliage is visible from both sides.
Masked materials force Nanite to evaluate the material per pixel during rasterization, which is the main cost the add-on removes. With real geometry you get the cheaper opaque path, correct shadows and stable silhouettes at any distance.
Экспорт в Unreal Engine
- Выделите объект
_nanite. При необходимости примените трансформации (Ctrl+A › All Transforms), чтобы получить чистый пивот. - File › Export › FBX: включите Selected Objects, Smoothing: Face, Apply Transform — по требованиям проекта. В результате уже есть кастомные нормали, пересчитывать их в Unreal не нужно.
- В Unreal импортируйте FBX и включите Build Nanite (или потом Nanite Support в редакторе Static Mesh). Normal Import Method — Import Normals.
- Переключите материал листвы с Masked на Opaque — вырез теперь настоящая геометрия, маска прозрачности не нужна. Оставьте Two Sided, если листва видна с обеих сторон.
Masked-материалы заставляют Nanite вычислять материал попиксельно во время растеризации — это главная цена, которую убирает аддон. С настоящей геометрией вы получаете более дешёвый непрозрачный путь, корректные тени и стабильный силуэт на любой дистанции.
Nanite Assemblies
Nanite Assemblies are the part of Unreal Engine 5.8's Nanite Foliage system built for repeating geometry: one static mesh made of instanced parts. A tree made of hundreds of copies of the same twig is stored as a few unique meshes plus a list of transforms.
Process to Nanite Assemblies uses the add-on's duplicate detection: every unique twig is processed once, every copy becomes an instance, and the result arrives in Unreal as a ready Nanite Assembly — no extra plugin, one console command.
Why it matters: memory
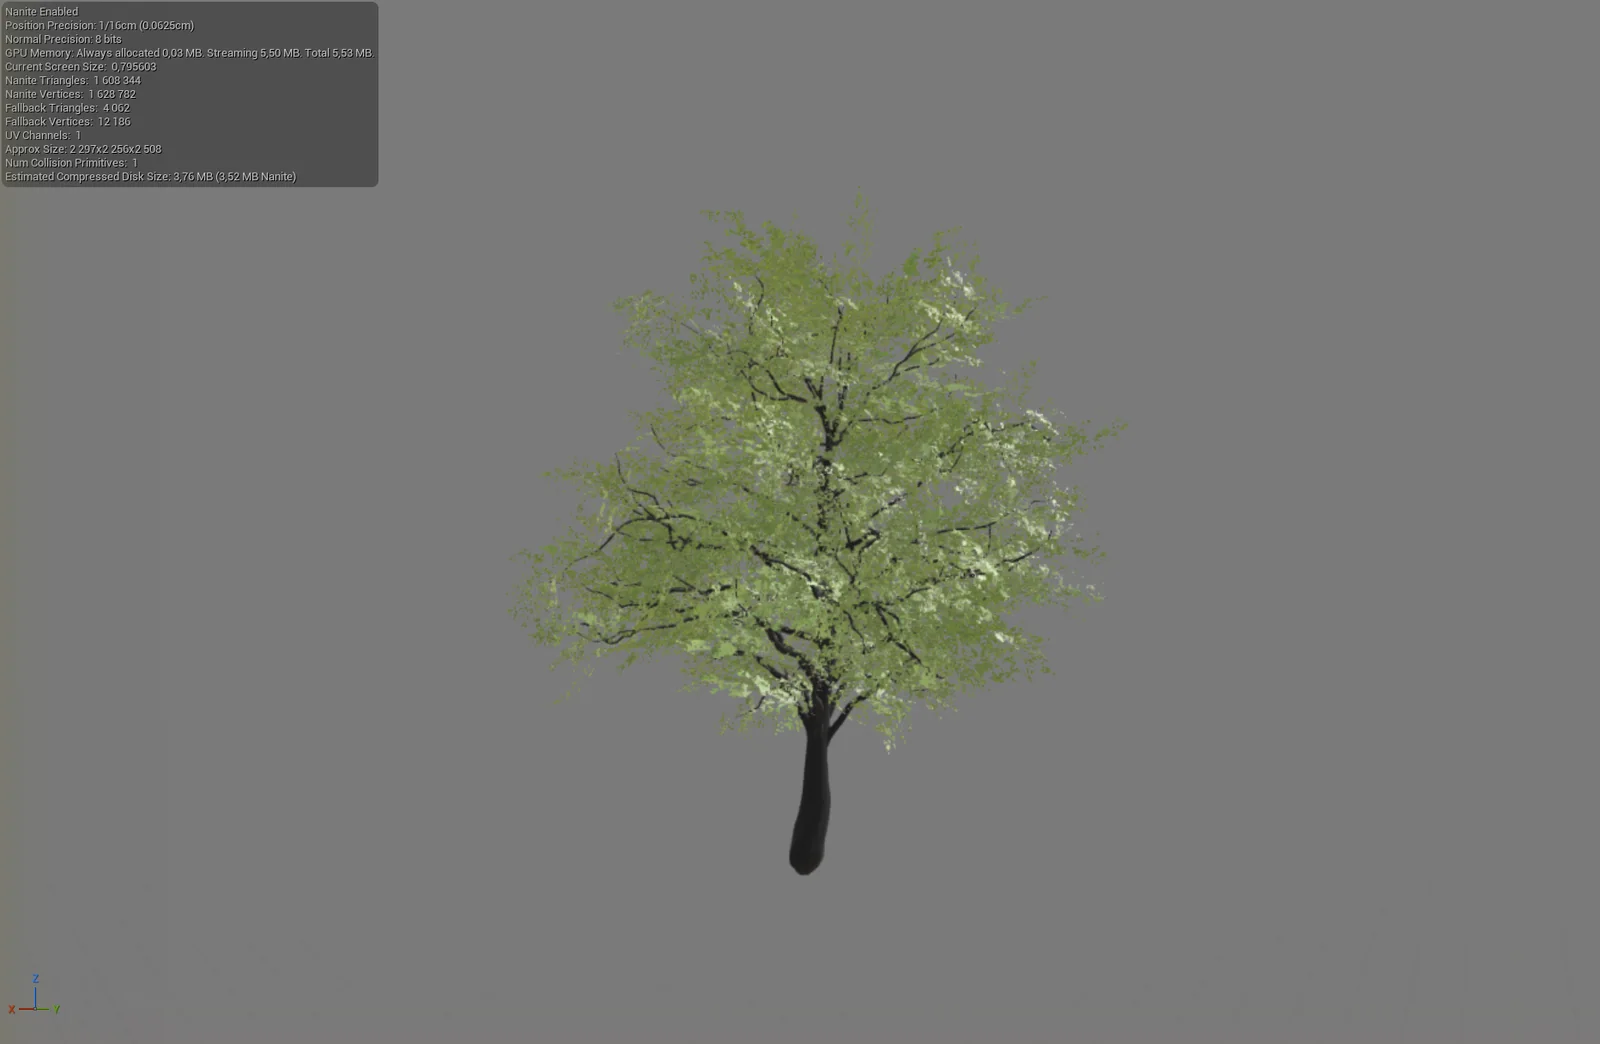
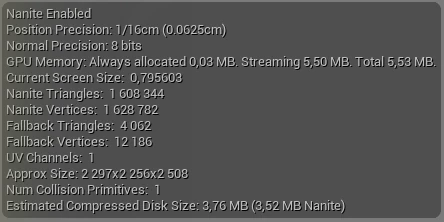
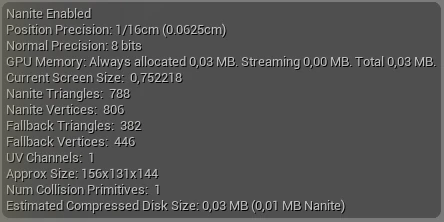
| Whole tree (assembly) | One twig part | |
|---|---|---|
| Nanite triangles | 1 608 344 | 788 × 510 instances |
| GPU memory | 5.53 MB (0.03 MB resident + 5.50 MB streaming) | 0.03 MB |
| Estimated disk size | 3.76 MB (3.52 MB Nanite data) | 0.03 MB |
Numbers are read from the static mesh editor overlay (top-left corner of an opened mesh). Epic reports the same effect at production scale: their largest tree went from 3.5 GB to about 29 MB on disk, and streaming memory for one tree in view from about 36 MB to 2.7 MB (Nanite Assemblies, Nanite Foliage).
Benefits
- Geometry stored once. A part is encoded once; its copies are just transforms — in Epic's words, instances are “simply a large array of matrices”.
- Lighter than regular instancing. Standard instances cost GPU scene memory and at least one root cluster each; assembly instances don't.
- LOD for free. Level of detail is handled at runtime: far away an assembly simplifies down to a single cluster, like a built-in HLOD.
- Scales to forests. Epic renders 500 000 instances of dozens of tree variants this way.
- Wind-ready. Skeletal assemblies can attach parts to bones for Nanite Foliage dynamic wind.
- Safe fallback. On platforms without Nanite the parts are merged into one regular mesh.
What to enable in Unreal (once per project)
- Edit › Plugins: enable Python Editor Script Plugin and Interchange OpenUSD (USD Core is enabled with it).
- Project Settings › Rendering › Nanite › Nanite Foliage (Experimental) — on. Without it Unreal refuses to build assemblies.
- Project Settings › Platforms › Windows: Default RHI DirectX 12, Targeted RHIs SM6. Nanite needs DX12 with Shader Model 6.
- Restart the editor.
The import script turns it on in Config/DefaultEngine.ini and asks you to restart the editor; run the same command again after it.
Export from Blender
- Save the
.blendfile: the output folder is created next to it. - Select the objects, set Instance Tolerance and press Analyze Unique Parts to see how many parts you will get.
- Press Process to Nanite Assemblies. For each object a folder
<name>_NaniteAssemblyappears with<name>.usdc(parts and instances, USD withNaniteAssemblyRootAPI),import_to_unreal.pyandassembly.json(parts, triangle counts, instance transforms). - The Unreal console command is copied to the clipboard; Copy Unreal Import Command copies it again later.
Import into Unreal
- Open the Content Browser folder you want to import into.
- Paste the command into the console (`, Cmd mode) and press Enter:
py "…/import_to_unreal.py". - A folder named after the tree appears:
StaticMeshes/SM_<name>_Assemblyis the Nanite Assembly, next to its parts andMaterials. Place the assembly in the level like any static mesh.
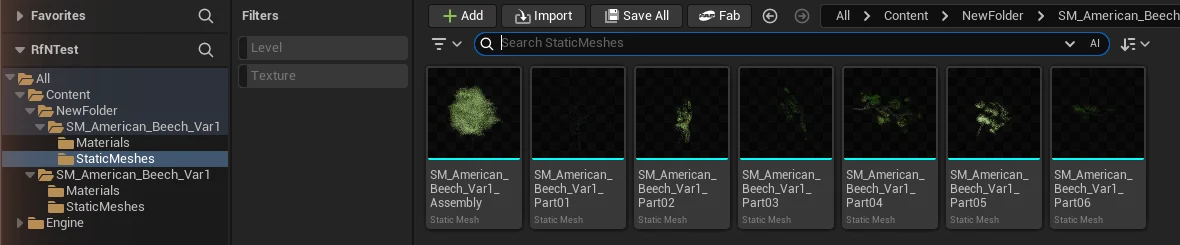
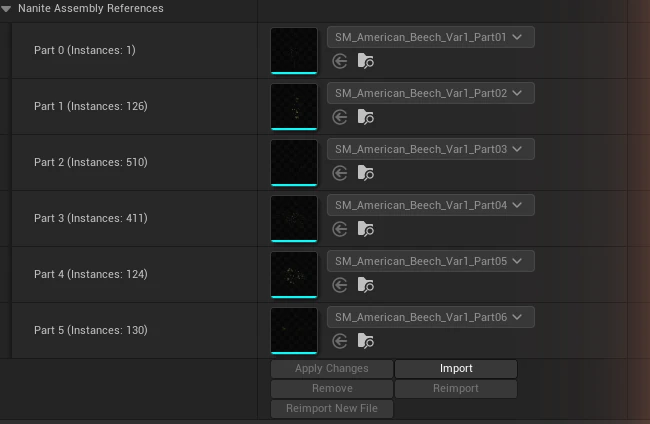
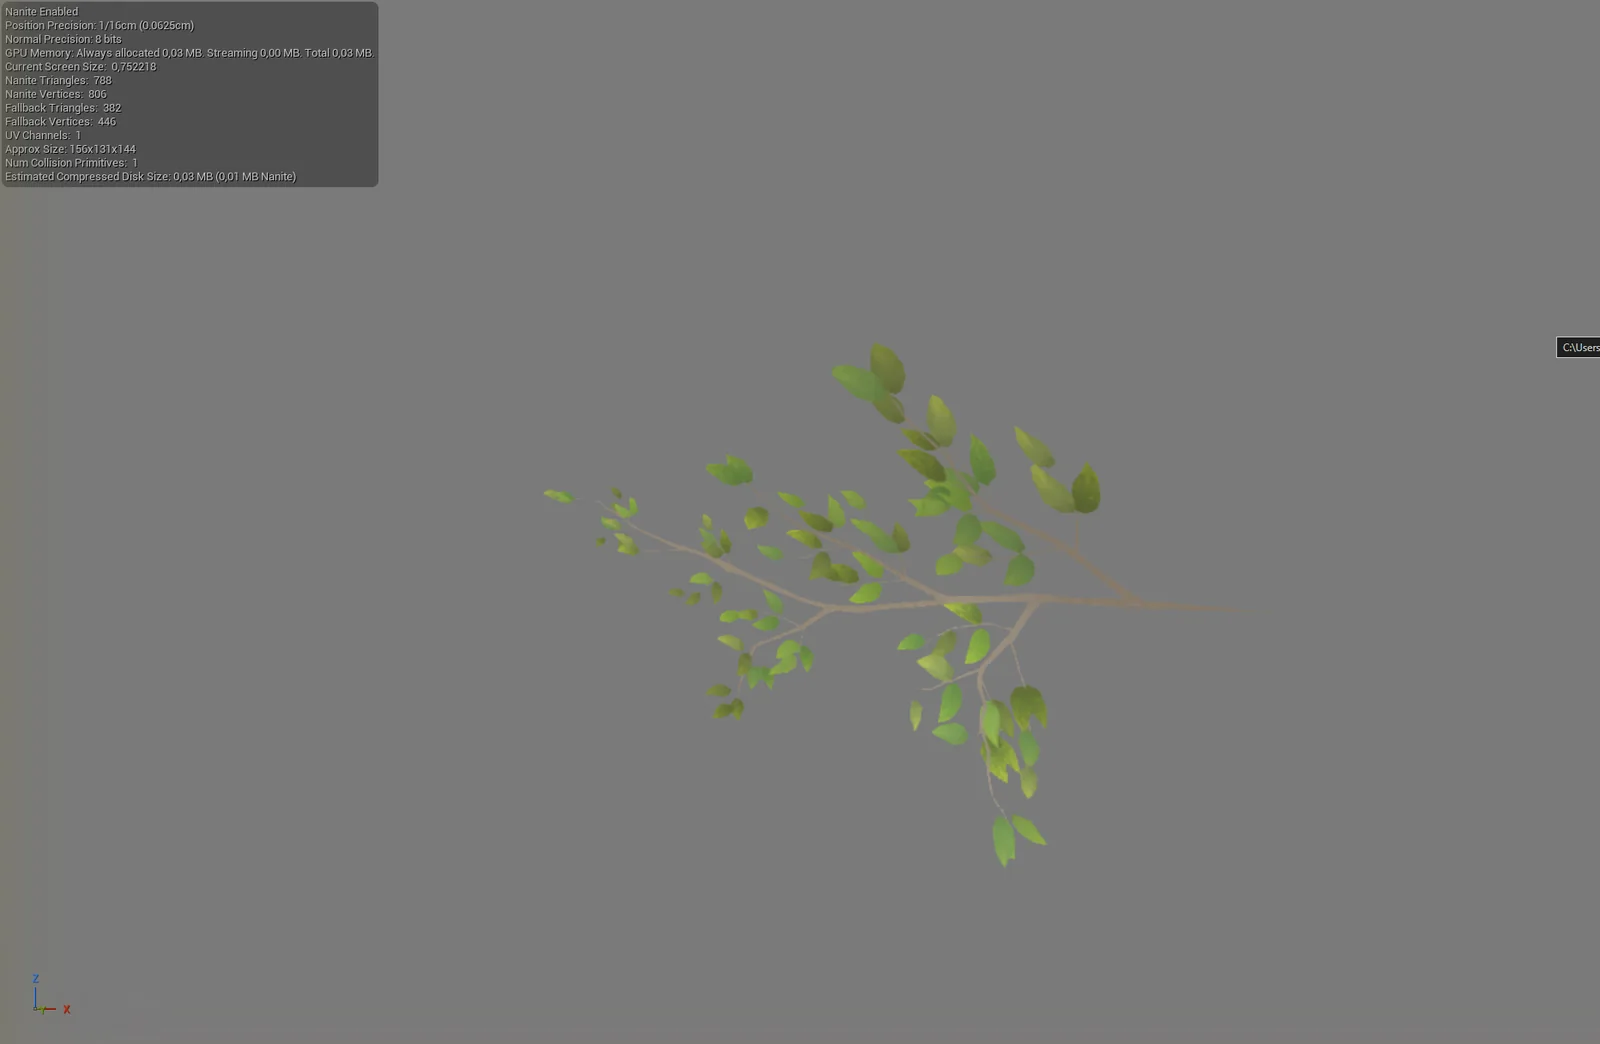
Left: Nanite Assembly References of the assembly with instance counts. Right: one twig part (510 copies in the tree).
Custom normals and vertex colors
Every copy of a part shares the part's own mesh. Data that depends on where a card sits in the tree therefore can't survive instancing:
- Custom normals. Tree-wide normals (for example normals pointing out of the crown for soft foliage shading) differ from copy to copy, but an instance can only rotate its part's normals. Either let Unreal recompute them — Build Settings › Recompute Normals on the parts, which the import already turns on — or clear custom normals on the source mesh in Blender before processing (Object Data › Normals › Clear Custom Split Normals Data).
- Vertex colors. The same goes for tree-wide vertex colors such as AO gradients or wind masks: every copy gets the colors of its prototype. Reset or repaint them per part before processing, or move that data into textures and material logic. Epic notes that per-instance data is not exposed to materials for assembly parts.
Use the regular Process Selected when a tree relies on such per-position data.
Instance Tolerance and Analyze Unique Parts
A tree often reuses the same card in several bent variants: the UV and topology are the same, the 3D shape is not. An instance can only rotate, scale and move a part, so by default each bend stays a part of its own. Instance Tolerance lets close variants merge: a copy becomes an instance when its RMS deviation from an earlier part is below this percent of the part size.
Analyze Unique Parts runs only the matching — no Nanite processing, nothing changes in the scene — and shows how many unique parts and instances you will get and the largest shift of merged geometry. It takes about a second on the beech.
| Instance Tolerance | Unique parts | Max shift |
|---|---|---|
| 0.5 % | 22 | 0 |
| 1–3 % | 21 | 2.5 cm |
| 5 % | 21 | 26 cm |
| 10 % | 11 | 62 cm |
| 15 % | 8 | 66 cm |
| 25 % | 6 | 66 cm |
The beech: 5 card types in UV, each in 4–5 bends. Unique parts include the bark. Max shift is the RMS deviation of the worst merged copy.
Limitations
- Nanite Assemblies and Nanite Foliage are experimental in Unreal Engine 5.8.
- One level of instancing: an assembly can't contain other assemblies; up to 65 000 instances per assembly.
- Mirrored copies become parts of their own; parts without an alpha texture (bark, trunk) stay one part.
- Materials arrive as material instances named after the Blender materials — assign your Unreal materials to them.
- The assembly pivot is the object origin; the object's rotation and scale are baked in.
Nanite Assemblies
Nanite Assemblies — часть системы Nanite Foliage в Unreal Engine 5.8, созданная для повторяющейся геометрии: один статический меш, собранный из экземпляров частей. Дерево из сотен копий одной ветки хранится как несколько уникальных мешей и список трансформов.
Process to Nanite Assemblies использует поиск одинаковых кусков из аддона: каждая уникальная ветка обрабатывается один раз, каждая копия становится экземпляром, а результат приходит в Unreal готовой Nanite Assembly — без дополнительных плагинов, одной командой в консоли.
Зачем: память
| Всё дерево (сборка) | Одна ветка | |
|---|---|---|
| Nanite-треугольников | 1 608 344 | 788 × 510 экземпляров |
| Память GPU | 5,53 МБ (0,03 МБ постоянно + 5,50 МБ подгружаемых) | 0,03 МБ |
| Размер на диске (оценка) | 3,76 МБ (3,52 МБ — данные Nanite) | 0,03 МБ |
Цифры взяты из статистики в левом верхнем углу открытого меша. Epic показывает тот же эффект на продакшен-масштабе: их самое большое дерево сократилось на диске с 3,5 ГБ до ~29 МБ, а потоковая память одного дерева в кадре — с ~36 МБ до 2,7 МБ (Nanite Assemblies, Nanite Foliage).
Плюсы
- Геометрия хранится один раз. Часть кодируется однажды, а копии — это только трансформы; по словам Epic, экземпляры — «просто большой массив матриц».
- Легче обычного инстансинга. Обычные экземпляры стоят памяти в GPU Scene и минимум одного корневого кластера каждый; экземпляры сборки — нет.
- LOD бесплатно. Детализация считается в рантайме: вдали сборка упрощается до одного кластера, как встроенный HLOD.
- Масштаб леса. Epic так рендерит 500 000 экземпляров десятков вариантов деревьев.
- Готовность к ветру. Скелетные сборки позволяют привязать части к костям для динамического ветра Nanite Foliage.
- Безопасный фолбэк. На платформах без Nanite части сливаются в один обычный меш.
Что включить в Unreal (один раз на проект)
- Edit › Plugins: включите Python Editor Script Plugin и Interchange OpenUSD (USD Core включится вместе с ним).
- Project Settings › Rendering › Nanite › Nanite Foliage (Experimental) — включить. Без этого Unreal не строит сборки.
- Project Settings › Platforms › Windows: Default RHI — DirectX 12, Targeted RHIs — SM6. Nanite требует DX12 с Shader Model 6.
- Перезапустите редактор.
Скрипт импорта сам включит его в Config/DefaultEngine.ini и попросит перезапустить редактор; после перезапуска выполните ту же команду ещё раз.
Экспорт из Blender
- Сохраните файл
.blend: папка с результатом создаётся рядом с ним. - Выделите объекты, задайте Instance Tolerance и нажмите Analyze Unique Parts, чтобы увидеть число частей.
- Нажмите Process to Nanite Assemblies. Для каждого объекта появится папка
<имя>_NaniteAssemblyс файлами<имя>.usdc(части и экземпляры, USD со схемойNaniteAssemblyRootAPI),import_to_unreal.pyиassembly.json(части, число треугольников, трансформы экземпляров). - Команда для консоли Unreal копируется в буфер; кнопка Copy Unreal Import Command скопирует её снова.
Импорт в Unreal
- Откройте в Content Browser папку, куда нужно импортировать.
- Вставьте команду в консоль (`, режим Cmd) и нажмите Enter:
py "…/import_to_unreal.py". - Появится папка с именем дерева:
StaticMeshes/SM_<имя>_Assembly— это Nanite Assembly, рядом её части иMaterials. Ставьте сборку на уровень как обычный статический меш.
Слева — Nanite Assembly References сборки с числом экземпляров. Справа — одна ветка (510 копий в дереве).
Кастомные нормали и цвета вершин
Все копии части используют один и тот же меш этой части. Поэтому данные, которые зависят от того, где карточка стоит в дереве, при инстансинге не сохраняются:
- Кастомные нормали. Нормали «на всё дерево» (например, направленные наружу из кроны для мягкого освещения листвы) у каждой копии свои, а экземпляр может только повернуть нормали своей части. Либо пусть Unreal пересчитает их — Build Settings › Recompute Normals у частей, импорт уже включает эту галочку, — либо сбросьте кастомные нормали на исходном меше в Blender перед обработкой (Object Data › Normals › Clear Custom Split Normals Data).
- Цвета вершин. То же с цветами вершин на всё дерево — градиенты AO, маски ветра: каждая копия получит цвета своего прототипа. Сбросьте или перекрасьте их по частям до обработки либо перенесите эти данные в текстуры и логику материала. Epic отмечает, что per-instance данные для частей сборки в материалах недоступны.
Если дерево опирается на такие данные, используйте обычный Process Selected.
Instance Tolerance и Analyze Unique Parts
Дерево часто использует одну карточку в нескольких вариантах изгиба: UV и топология одинаковые, а форма в 3D — нет. Экземпляр может только повернуть, отмасштабировать и сдвинуть часть, поэтому по умолчанию каждый изгиб — отдельная часть. Instance Tolerance позволяет слить близкие варианты: копия становится экземпляром, если её среднеквадратичное отклонение от уже найденной части меньше этого процента от размера куска.
Analyze Unique Parts выполняет только сопоставление — без Nanite-обработки и без изменений в сцене — и показывает, сколько получится частей и экземпляров и насколько максимально сместится слитая геометрия. На буке это около секунды.
| Instance Tolerance | Уникальных частей | Макс. смещение |
|---|---|---|
| 0.5 % | 22 | 0 |
| 1–3 % | 21 | 2,5 см |
| 5 % | 21 | 26 см |
| 10 % | 11 | 62 см |
| 15 % | 8 | 66 см |
| 25 % | 6 | 66 см |
Бук: 5 типов карточек по UV, каждая в 4–5 изгибах. В число частей входит кора. Макс. смещение — среднеквадратичное отклонение самой далёкой слитой копии.
Ограничения
- Nanite Assemblies и Nanite Foliage в Unreal Engine 5.8 — экспериментальные функции.
- Один уровень инстансинга: сборка не может содержать другие сборки; до 65 000 экземпляров в одной сборке.
- Зеркальные копии становятся отдельными частями; части без альфа-текстуры (кора, ствол) остаются одной частью.
- Материалы приходят как Material Instance с именами из Blender — назначьте им свои материалы Unreal.
- Пивот сборки — начало координат объекта; поворот и масштаб объекта запекаются.
Example: beech tree
A real test on a production American beech made of alpha cards (2 materials: bark and branch atlas), Blender 5.2, caches on.
| Source | Result | |
|---|---|---|
| Triangles | 27,888 | 1,608,438 |
| Loose parts with alpha | 1,301 | |
| Estimate / real time | 1 m 35 s / 1 m 52 s | |
Settings used: Alpha Threshold 0.33, Classification 0.5, Min Island Area 0.01, Simplify Tolerance (Areas/Holes) 10, Min Contour Area UV 0.1, Max Texture Rect 1024, Hole Thickness 0.05 (tree is ~24 m tall), Target Density 500.
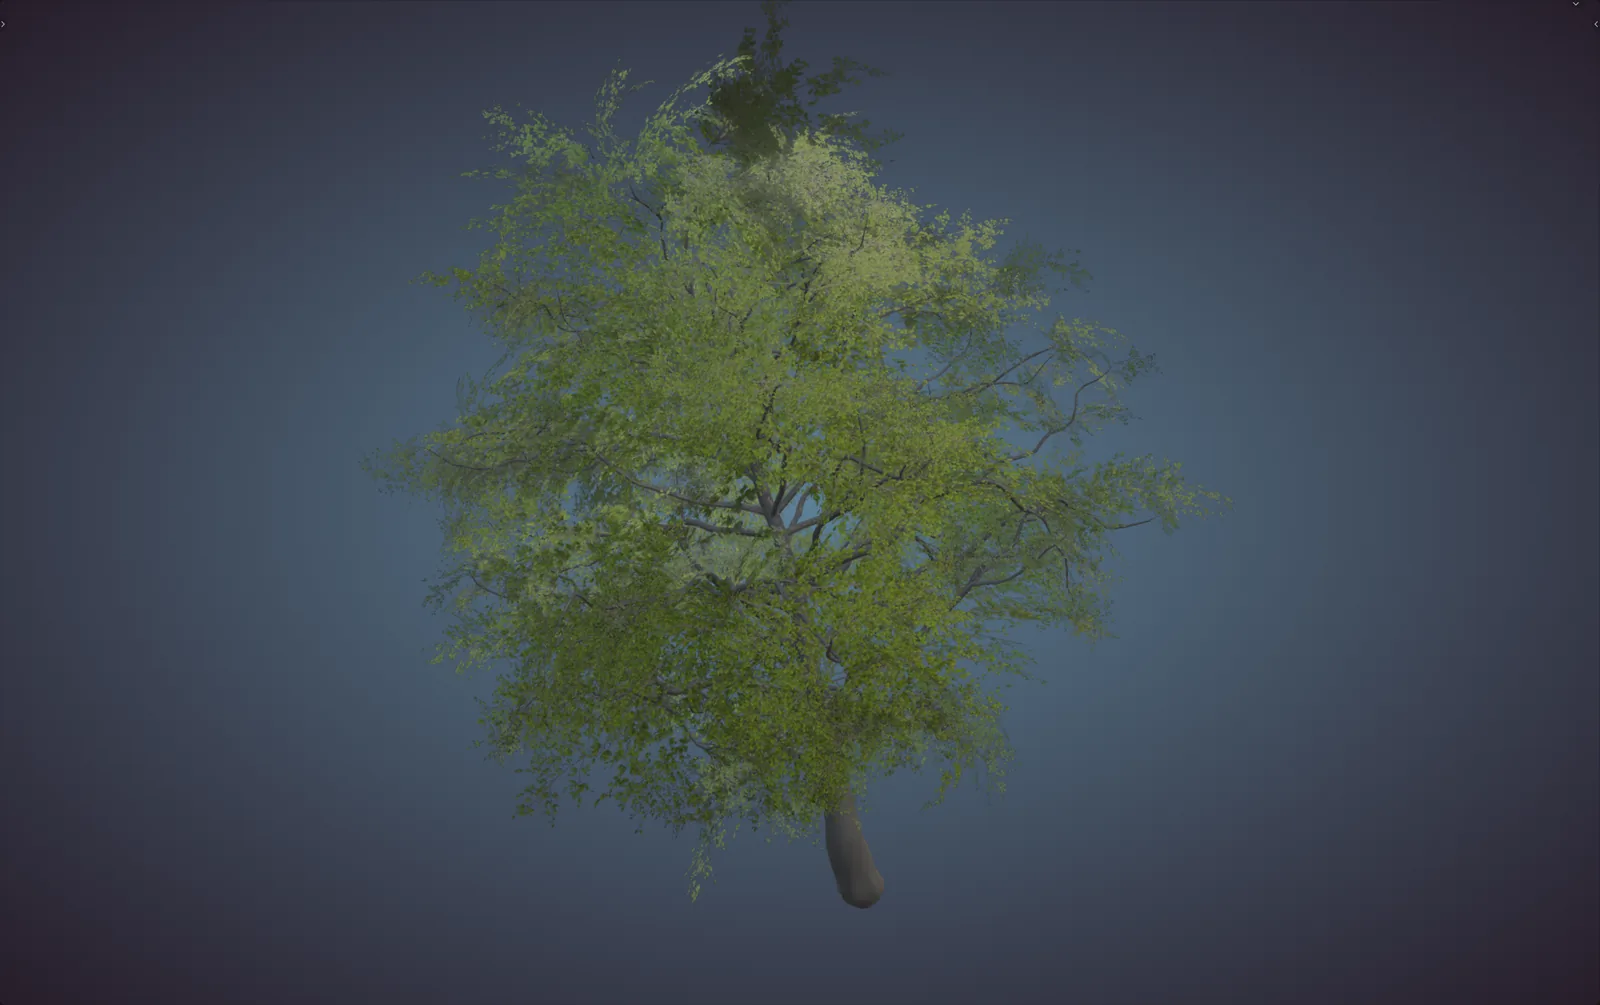
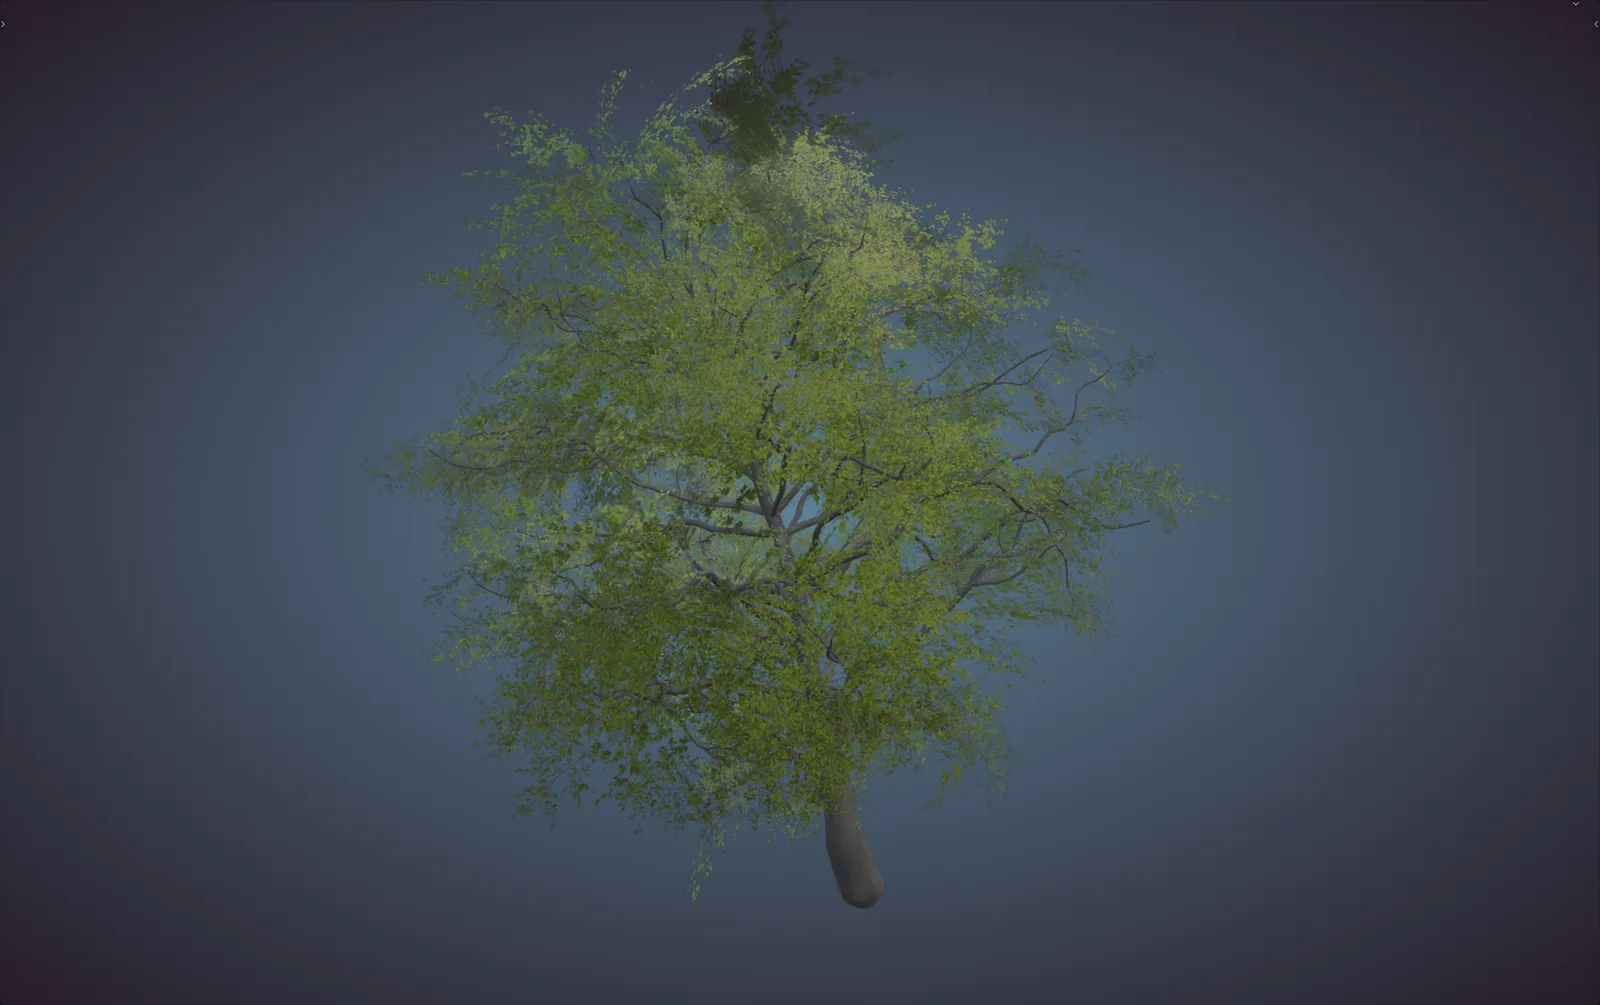
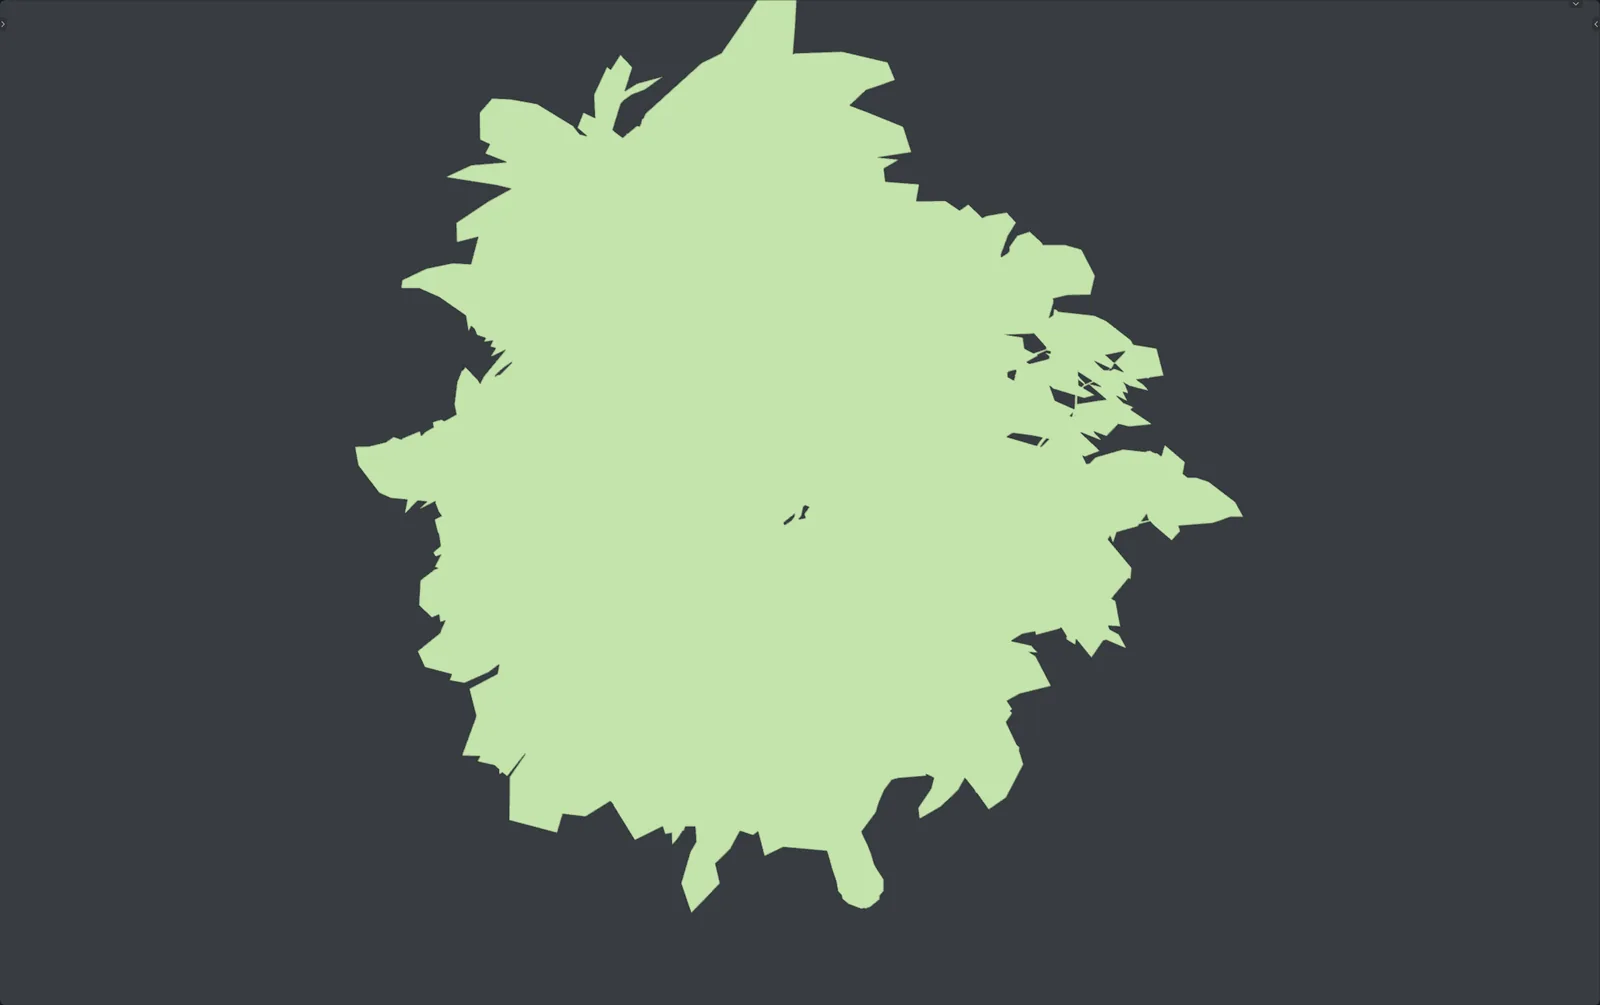
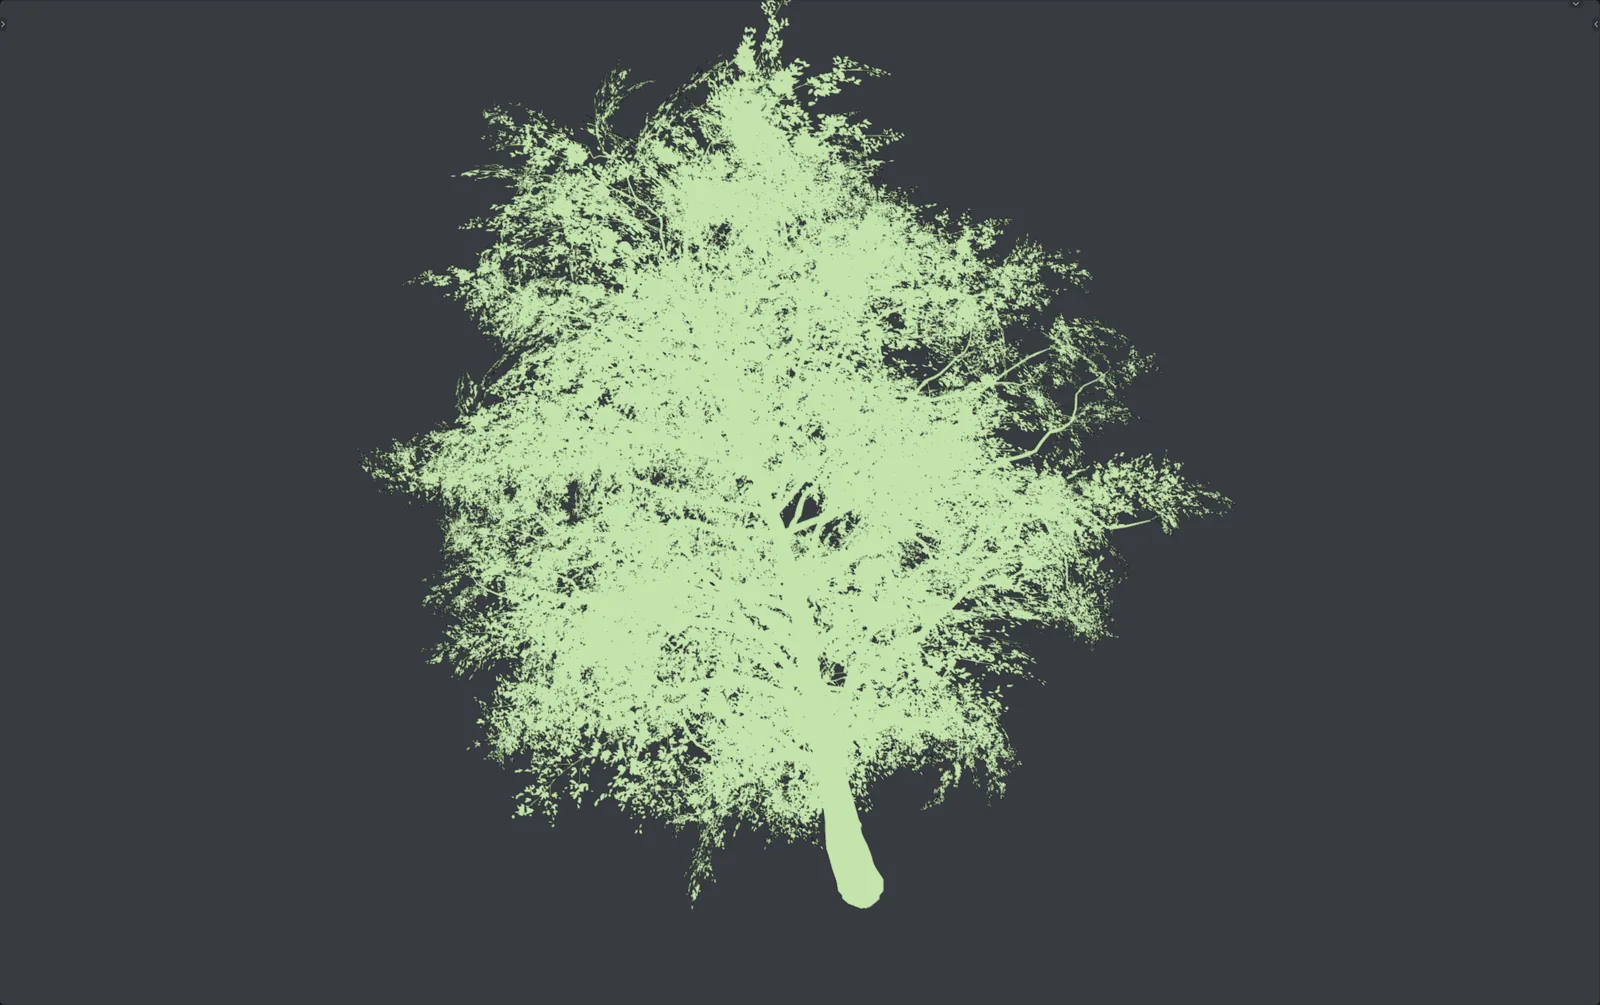
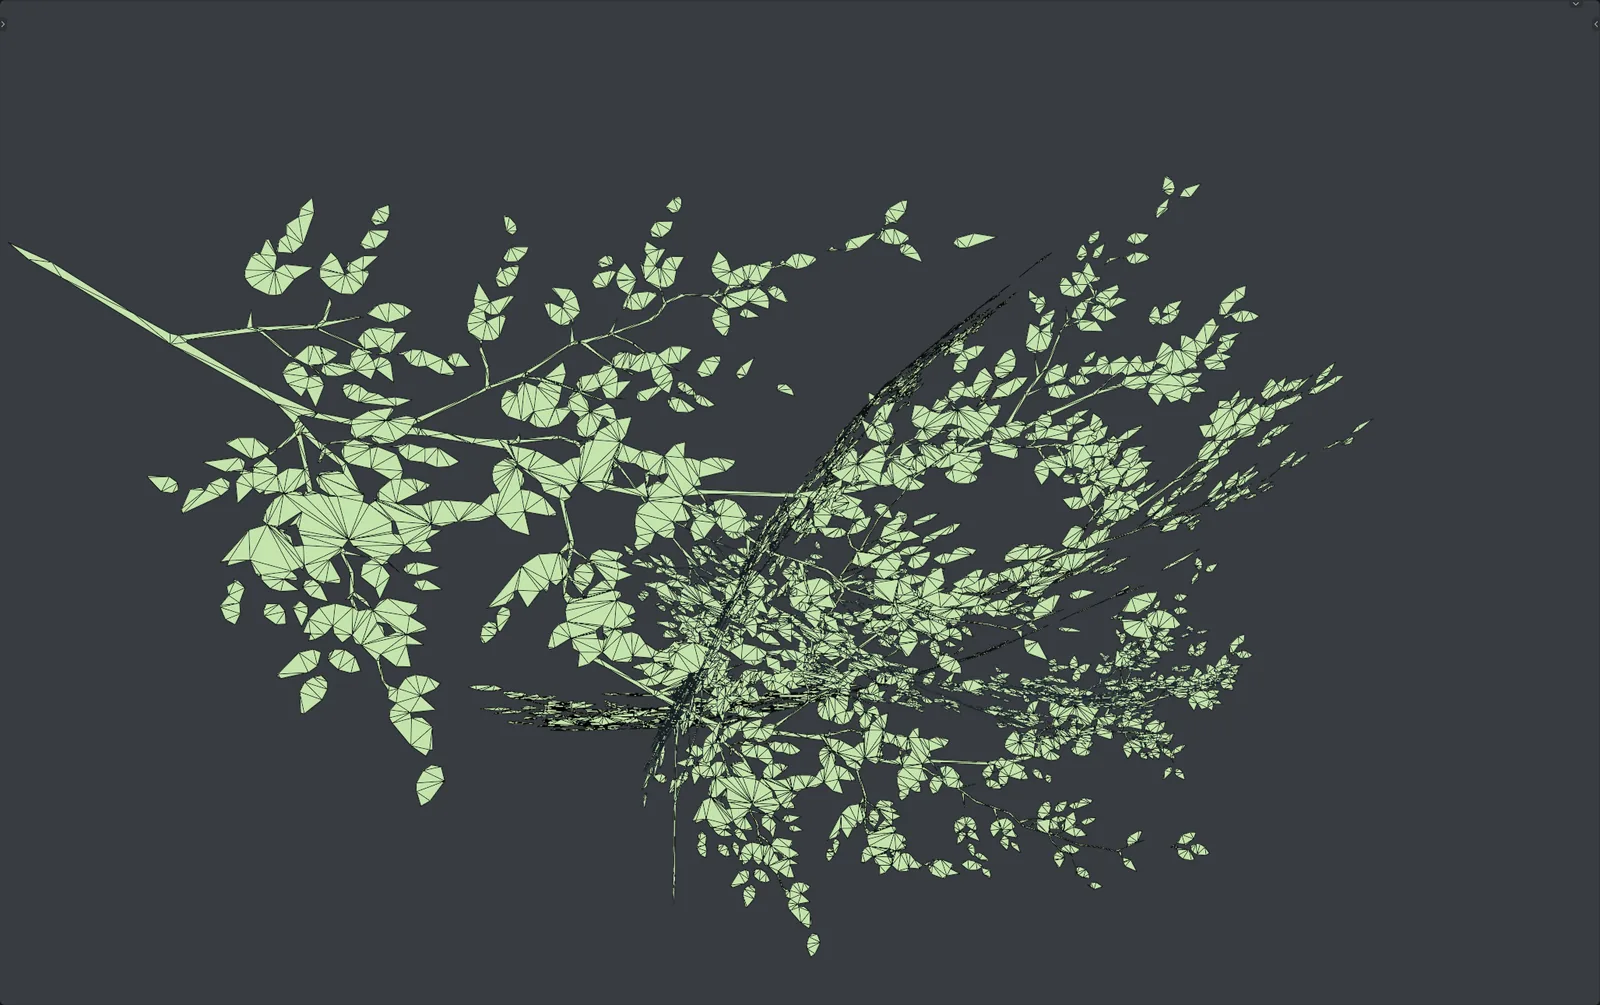
Top: Material Preview. Bottom: flat shading without textures — the source is just cards, the result is the real silhouette.
Small pieces
| Piece | Source polygons | Result triangles | Time |
|---|---|---|---|
| Single leaf card | 4 | 812 | 4.4 s |
| Twig | 14 | 2,269 | 5.1 s |
| Branch | 28 | 4,888 | 5.7 s |
| Branch cluster | 70 | 12,220 | 5.7 s |
Пример: бук
Реальный тест на продакшен-модели американского бука из альфа-карточек (2 материала: кора и атлас веток), Blender 5.2, кэши включены.
| Исходник | Результат | |
|---|---|---|
| Треугольники | 27 888 | 1 608 438 |
| Кусков с альфой | 1 301 | |
| Оценка / реальное время | 1 м 35 с / 1 м 52 с | |
Настройки: Alpha Threshold 0.33, Classification 0.5, Min Island Area 0.01, Simplify Tolerance (Areas/Holes) 10, Min Contour Area UV 0.1, Max Texture Rect 1024, Hole Thickness 0.05 (дерево высотой ~24 м), Target Density 500.
Сверху — Material Preview. Снизу — плоская заливка без текстур: исходник — просто карточки, результат — настоящий силуэт.
Маленькие куски
| Кусок | Полигонов в исходнике | Треугольников в результате | Время |
|---|---|---|---|
| Одна карточка | 4 | 812 | 4,4 с |
| Веточка | 14 | 2 269 | 5,1 с |
| Ветка | 28 | 4 888 | 5,7 с |
| Кластер веток | 70 | 12 220 | 5,7 с |
Tips & presets
Starting points — every texture is different, so expect to fine-tune with Quick Test.
| Asset | Alpha Thr. | Simplify | Min Contour Area | Other |
|---|---|---|---|---|
| Tree foliage | 0.1–0.33 | 0.5–10 | 0.05–0.1 | Density 500–1000, caches on |
| Grass | 0.15–0.25 | 0.5–1.0 | 0.05 | Max Texture Rect 512–1024 |
| Lace / cloth | 0.2–0.3 | 0.2–0.4 | small | Holes simplify 0.1–0.3, density 1000–2000 |
| Grates / grids | 0.3–0.5 | 0.5 | 0.1–0.5 | Check Hole Thickness vs. scale |
- Apply scale before processing — Hole Thickness and Min Island Area are in scene units.
- Process similar objects together: caches work across the whole selection.
- Big crowns: high Simplify Tolerance (5–10) gives far fewer triangles with no visible loss at normal viewing distance.
- Check in Solid mode with the texture off: you will see the actual silhouette, not the alpha.
- Save before big runs. Esc cancel is safe, but a crash is never fun.
Советы и пресеты
Отправные точки — все текстуры разные, поэтому доводите через Quick Test.
| Ассет | Alpha Thr. | Simplify | Min Contour Area | Прочее |
|---|---|---|---|---|
| Листва деревьев | 0.1–0.33 | 0.5–10 | 0.05–0.1 | Density 500–1000, кэши вкл. |
| Трава | 0.15–0.25 | 0.5–1.0 | 0.05 | Max Texture Rect 512–1024 |
| Кружево / ткань | 0.2–0.3 | 0.2–0.4 | малое | Holes simplify 0.1–0.3, density 1000–2000 |
| Решётки / сетки | 0.3–0.5 | 0.5 | 0.1–0.5 | Сверьте Hole Thickness с масштабом |
- Применяйте масштаб перед обработкой — Hole Thickness и Min Island Area заданы в единицах сцены.
- Обрабатывайте похожие объекты вместе: кэш работает на всё выделение.
- Большие кроны: высокий Simplify Tolerance (5–10) даёт намного меньше треугольников без заметной потери на обычной дистанции.
- Проверяйте в режиме Solid без текстуры — увидите реальный силуэт, а не альфу.
- Сохраняйтесь перед большими прогонами. Отмена по Esc безопасна, но сбой — это всегда неприятно.
Troubleshooting
A piece ended up in <name>_broken
- No UV map, or UVs are degenerate (zero area, all in one point) — unwrap and run again.
- The piece is too small to produce any contour after filtering — lower the Min Contour Area / Min Island Area or ignore it.
- The texture can't be read (missing file, packed image not found) — check the Image Texture node.
Nothing happened to an object
Its materials have no recognised alpha source, so it was passed through. Check Material setup — the mask must be linked directly to the BSDF.
Contours are rough, leaves are angular
Lower Simplify Tolerance (Areas). If the texture region is large, raise Max Texture Rect.
Lots of tiny parasitic triangles
Raise Min Contour Area UV (Areas), Min Island Area or Alpha Threshold.
Thin twigs or blades disappeared
Lower Alpha Threshold, Min Contour Area UV (Areas) and Simplify Tolerance (Areas); raise Max Texture Rect.
Holes are too big, too small or missing
Adjust Hole Thickness for your object scale. Missing holes can also mean Min Contour Area UV (Holes) or Simplify Tolerance (Holes) is too high, or a detail inside the hole needs a lower Contour Classification Threshold.
Boolean is slow or produces artifacts
Reduce the number of holes (raise Min Contour Area UV (Holes)) or slightly increase Hole Thickness.
UVs drift / texture lies unevenly / normals look faceted
Raise Target Density.
Processing is too slow
Lower Max Texture Rect and Target Density; raise Simplify Tolerance and Min Contour Area; keep caches on and process duplicates together. Use Estimate first.
Seeing the logs
Open Window › Toggle System Console (Windows), then in Blender's Python console run bpy.context.scene.rfnan_settings.debug_mode = True. Stage timings and cache hits/misses are printed during the run.
Решение проблем
Кусок попал в <имя>_broken
- Нет UV-развёртки или она вырождена (нулевая площадь, всё в одной точке) — разверните и запустите снова.
- Кусок слишком мал и после фильтрации не даёт контуров — уменьшите Min Contour Area / Min Island Area или проигнорируйте.
- Текстуру не удаётся прочитать (нет файла, не найдено упакованное изображение) — проверьте ноду Image Texture.
С объектом ничего не произошло
У его материалов не найден источник альфы, поэтому он прошёл без изменений. Проверьте Настройку материала — маска должна быть подключена к BSDF напрямую.
Контуры грубые, листья угловатые
Уменьшите Simplify Tolerance (Areas). Если область текстуры большая — увеличьте Max Texture Rect.
Много мелких паразитных треугольников
Увеличьте Min Contour Area UV (Areas), Min Island Area или Alpha Threshold.
Пропали тонкие веточки или травинки
Уменьшите Alpha Threshold, Min Contour Area UV (Areas) и Simplify Tolerance (Areas); увеличьте Max Texture Rect.
Дырки слишком большие, маленькие или их нет
Подберите Hole Thickness под масштаб объекта. Пропавшие дырки также могут означать слишком большие Min Contour Area UV (Holes) или Simplify Tolerance (Holes) либо то, что деталь внутри дырки требует меньшего Contour Classification Threshold.
Boolean работает медленно или даёт артефакты
Уменьшите количество дырок (увеличьте Min Contour Area UV (Holes)) или немного увеличьте Hole Thickness.
UV «поплыли» / текстура легла неровно / нормали гранёные
Увеличьте Target Density.
Обработка слишком долгая
Уменьшите Max Texture Rect и Target Density; увеличьте Simplify Tolerance и Min Contour Area; держите кэши включёнными и обрабатывайте дубликаты вместе. Сначала запустите Estimate.
Как посмотреть логи
Откройте Window › Toggle System Console (Windows), затем в Python-консоли Blender выполните bpy.context.scene.rfnan_settings.debug_mode = True. Во время работы будут выводиться время этапов и попадания/промахи кэша.
FAQ
Won’t all those triangles slow Unreal down?
No. They are Nanite triangles: Nanite renders dense opaque geometry efficiently, and its cost follows screen pixels, not mesh size. The alpha mask you removed was the expensive part.
How many triangles will be added?
It depends on the number and complexity of opaque shapes — typically 50–200× the source card count (the beech above: ×58). Nanite is made for counts like that, and Quick Test shows the real number in seconds.
Can I process many objects at once?
Yes — select them all. With caches on, a batch is faster than one by one.
What happens with multiple materials?
Each is processed separately; parts without alpha pass through; all are joined back into one _nanite object with the original material slots.
Are vertex colors kept?
Yes. Color attributes keep their name, domain (point / corner) and data type, and custom normals are transferred from the source piece.
Why does Blender freeze?
It shouldn't anymore: jobs run with a progress bar and the UI stays responsive. Very heavy steps (a big Boolean or the final join) may still pause the UI briefly.
Can I undo?
Press Esc during the run to roll back cleanly. After it finishes, delete the _nanite object (sources are kept by default) or use Ctrl+Z.
Does it work with Blender 5?
Yes, tested on Blender 5.2 LTS.
Where can I buy it?
FAQ
Не замедлят ли Unreal все эти треугольники?
Нет. Это треугольники для Nanite: он эффективно рисует плотную непрозрачную геометрию, и его цена зависит от пикселей на экране, а не от размера меша. Дорогой частью была как раз альфа-маска, которую вы убрали.
Сколько треугольников добавится?
Зависит от количества и сложности непрозрачных форм — обычно в 50–200 раз больше, чем было в карточках (бук выше: ×58). Nanite рассчитан на такие объёмы, а Quick Test покажет точную цифру за секунды.
Можно обработать много объектов сразу?
Да — выделите их все. С включёнными кэшами пакет обрабатывается быстрее, чем по одному.
Что с несколькими материалами?
Каждый обрабатывается отдельно; части без альфы проходят как есть; всё собирается обратно в один объект _nanite с исходными слотами материалов.
Сохраняются ли цвета вершин?
Да. Цветовые атрибуты сохраняют имя, домен (point / corner) и тип данных, а кастомные нормали переносятся с исходного куска.
Почему Blender зависает?
Больше не должен: задачи идут с прогресс-баром, интерфейс отзывчив. Очень тяжёлые шаги (большой Boolean или финальное объединение) могут ненадолго притормозить UI.
Можно отменить?
Нажмите Esc во время работы — всё аккуратно откатится. После завершения удалите объект _nanite (исходники по умолчанию остаются) или используйте Ctrl+Z.
Работает в Blender 5?
Да, проверено на Blender 5.2 LTS.
Где купить?
What's new
v1.1.0
- Process to Nanite Assemblies: export to Unreal Engine 5.8 Nanite Assemblies through USD, with an import script for the Unreal console.
- Instance Tolerance and Analyze Unique Parts: merge bent variants of the same card and preview the part count before export.
v1.0.x
- Background jobs with a progress bar for Process, Quick Test and Estimate; Esc cancel fully restores the scene.
- Part-by-part processing with checkpoints (Max Parts Per Batch) — no more freezes on meshes with thousands of parts.
- Other objects are hidden during processing for speed.
- More accurate time estimate based on measured cache speed-up.
- Separate Color / Separate RGB channel masks are detected; alpha channel handling fixed.
- Direct transfer of custom normals and color attributes from the source; sharp edges preserved.
- Fix: generated faces now follow the source face orientation (before, their winding could be inverted while the custom normals were correct, so the mesh looked dark and backface culling was flipped).
Что нового
v1.1.0
- Process to Nanite Assemblies: экспорт в Nanite Assemblies Unreal Engine 5.8 через USD со скриптом импорта для консоли Unreal.
- Instance Tolerance и Analyze Unique Parts: слияние вариантов изгиба одной карточки и предпросмотр числа частей до экспорта.
v1.0.x
- Фоновые задачи с прогресс-баром для Process, Quick Test и Estimate; отмена по Esc полностью восстанавливает сцену.
- Обработка по одному куску с контрольными точками (Max Parts Per Batch) — больше никаких зависаний на мешах с тысячами частей.
- Остальные объекты скрываются на время обработки для ускорения.
- Более точная оценка времени на основе измеренного ускорения от кэша.
- Распознаются маски через Separate Color / Separate RGB; исправлена работа с альфа-каналом.
- Прямой перенос кастомных нормалей и цветовых атрибутов с исходника; жёсткие рёбра сохраняются.
- Исправление: грани результата теперь ориентированы так же, как у исходника (раньше их порядок обхода мог быть обратным при правильных кастомных нормалях — меш выглядел тёмным, а отсечение задних граней работало наоборот).